Greenbone Vulnerability Manager Rev 13
Greenbone is the world's most used open source vulnerability management provider. Their mission is to help you detect vulnerabilities before they can be exploited - reducing the risk and impact of cyberattacks. OpenVAS is a full-featured vulnerability scanner. Its capabilities include unauthenticated testing, authenticated testing, various high level and low level internet and industrial protocols, performance tuning for large-scale scans and a powerful internal programming language to implement any type of vulnerability test.
GVM website OpenVAS website GitHub GVM official docs

Configuration files
TIP
These files below have been used for testing and successfully configured Greenbone Vulnerability Manager. (Do not run these files as executable scripts).
- GVM 22.4.x (Kali 2023.3)
- GVM 22.4.x (Ubuntu 22.04)
- GVM 22.4.0 (Ubuntu 22.04)
- GVM 22.4.0 (Ubuntu 20.04)
- GVM 21.4.5
- GVM 21.4.4
- GVM 21.4.3
- GVM 21.4.2
System requirements
WARNING
These minimum system requirements (for VMware ESXi) are not official recommendations but are used during the testing and building of Greenbone Vulnerability Manager (GVM) from source.
- CPU Cores: 2
- Memory: 4 GB RAM
- Free space: 20 GB
Install GVM 22.4 from source
We'll first update our system and then install the prerequisites for GVM.
sudo apt-get update && \
sudo apt-get -y upgrade && \
sudo apt-get install -y build-essential && \
sudo apt-get install -y cmake pkg-config gcc-mingw-w64 \
libgnutls28-dev libxml2-dev libssh-gcrypt-dev libunistring-dev \
libldap2-dev libgcrypt20-dev libpcap-dev libglib2.0-dev libgpgme-dev libradcli-dev libjson-glib-dev \
libksba-dev libical-dev libpq-dev libsnmp-dev libpopt-dev libnet1-dev gnupg gnutls-bin \
libmicrohttpd-dev redis-server libhiredis-dev openssh-client xsltproc nmap \
bison postgresql postgresql-server-dev-all smbclient fakeroot sshpass wget \
heimdal-dev dpkg rsync zip rpm nsis socat libbsd-dev snmp uuid-dev curl gpgsm \
python3 python3-paramiko python3-lxml python3-defusedxml python3-pip python3-psutil python3-impacket \
python3-setuptools python3-packaging python3-wrapt python3-cffi python3-redis python3-gnupg \
xmlstarlet texlive-fonts-recommended texlive-latex-extra perl-base xml-twig-tools \
libpaho-mqtt-dev python3-paho-mqtt mosquitto xmltoman doxygen graphviz
sudo apt-get update && \
sudo apt-get -y upgrade && \
sudo apt-get install -y build-essential && \
sudo apt-get install -y cmake pkg-config gcc-mingw-w64 \
libgnutls28-dev libxml2-dev libssh-gcrypt-dev libunistring-dev \
libldap2-dev libgcrypt20-dev libpcap-dev libglib2.0-dev libgpgme-dev libradcli-dev libjson-glib-dev \
libksba-dev libical-dev libpq-dev libsnmp-dev libpopt-dev libnet1-dev gnupg gnutls-bin \
libmicrohttpd-dev redis-server libhiredis-dev openssh-client xsltproc nmap \
bison postgresql postgresql-server-dev-all smbclient fakeroot sshpass wget \
heimdal-dev dpkg rsync zip rpm nsis socat libbsd-dev snmp uuid-dev curl gpgsm \
python3 python3-paramiko python3-lxml python3-defusedxml python3-pip python3-psutil python3-impacket \
python3-setuptools python3-packaging python3-wrapt python3-cffi python3-redis python3-gnupg \
xmlstarlet texlive-fonts-recommended texlive-latex-extra perl-base xml-twig-tools \
libpaho-mqtt-dev python3-paho-mqtt mosquitto xmltoman doxygen
Set up GVM with user-defined installation paths
Create the GVM user and add it to the sudoers group without requiring login. Additionally, add your current sudo user to the GVM group so you are permitted to run gvmd.
INFO
Kali Linux already includes a pre-made user and group for GVM.
sudo useradd -r -M -U -G sudo -s /usr/sbin/nologin gvm && \
sudo usermod -aG gvm $USER && su $USER
Next, define the base, source, build, and installation directories.
export PATH=$PATH:/usr/local/sbin && export INSTALL_PREFIX=/usr/local && \
export SOURCE_DIR=$HOME/source && mkdir -p $SOURCE_DIR && \
export BUILD_DIR=$HOME/build && mkdir -p $BUILD_DIR && \
export INSTALL_DIR=$HOME/install && mkdir -p $INSTALL_DIR
export PATH=$PATH:/usr/local/sbin && export INSTALL_PREFIX=/usr/local && \
export SOURCE_DIR=$HOME/source && mkdir -p $SOURCE_DIR && \
export BUILD_DIR=$HOME/build && mkdir -p $BUILD_DIR && \
export INSTALL_DIR=$HOME/install && mkdir -p $INSTALL_DIR
Import GVM signing key
Download the signing key from Greenbone community to validate the integrity of the source files.
curl -f -L https://www.greenbone.net/GBCommunitySigningKey.asc -o /tmp/GBCommunitySigningKey.asc && \
gpg --import /tmp/GBCommunitySigningKey.asc
curl -f -L https://www.greenbone.net/GBCommunitySigningKey.asc -o /tmp/GBCommunitySigningKey.asc && \
gpg --import /tmp/GBCommunitySigningKey.asc
Edit the GVM signing key to establish ultimate trust.
echo "8AE4BE429B60A59B311C2E739823FAA60ED1E580:6:" > /tmp/ownertrust.txt && \
gpg --import-ownertrust < /tmp/ownertrust.txt
echo "8AE4BE429B60A59B311C2E739823FAA60ED1E580:6:" > /tmp/ownertrust.txt && \
gpg --import-ownertrust < /tmp/ownertrust.txt
Build GVM libraries
Download and build the GVM libraries.
export GVM_LIBS_VERSION=22.8.0 && \
curl -f -L https://github.com/greenbone/gvm-libs/archive/refs/tags/v$GVM_LIBS_VERSION.tar.gz -o $SOURCE_DIR/gvm-libs-$GVM_LIBS_VERSION.tar.gz && \
curl -f -L https://github.com/greenbone/gvm-libs/releases/download/v$GVM_LIBS_VERSION/gvm-libs-v$GVM_LIBS_VERSION.tar.gz.asc -o $SOURCE_DIR/gvm-libs-$GVM_LIBS_VERSION.tar.gz.asc && \
gpg --verify $SOURCE_DIR/gvm-libs-$GVM_LIBS_VERSION.tar.gz.asc $SOURCE_DIR/gvm-libs-$GVM_LIBS_VERSION.tar.gz
Ensure that the output confirms the signature from the Greenbone Community Feed is valid.
gpg: Signature made Tue 03 Aug 2021 12:11:44 PM UTC
gpg:                using RSA key 8AE4BE429B60A59B311C2E739823FAA60ED1E580
gpg: checking the trustdb
gpg: marginals needed: 3  completes needed: 1  trust model: pgp
gpg: depth: 0  valid:   1  signed:   0  trust: 0-, 0q, 0n, 0m, 0f, 1u
gpg: Good signature from "Greenbone Community Feed integrity key" [ultimate]
Before proceeding with the installation of GVM libraries on Ubuntu 20.04, you'll need to install the Paho C client.
WARNING
Skip this step if you're running Ubuntu 21.04 or a later version.
curl -f -L https://github.com/eclipse/paho.mqtt.c/archive/refs/tags/v1.3.10.tar.gz -o $SOURCE_DIR/paho-client-1.3.10.tar.gz && \
tar -C $SOURCE_DIR -xvzf $SOURCE_DIR/paho-client-1.3.10.tar.gz && \
mkdir -p $BUILD_DIR/paho-client && cd $BUILD_DIR/paho-client && \
cmake $SOURCE_DIR/paho.mqtt.c-1.3.10 \
  -DPAHO_WITH_SSL=ON && \
sudo cmake --build $BUILD_DIR/paho-client --target install
Once you've confirmed that the signature is valid, proceed to install the GVM libraries.
tar -C $SOURCE_DIR -xvzf $SOURCE_DIR/gvm-libs-$GVM_LIBS_VERSION.tar.gz && \
mkdir -p $BUILD_DIR/gvm-libs && cd $BUILD_DIR/gvm-libs && \
cmake $SOURCE_DIR/gvm-libs-$GVM_LIBS_VERSION \
  -DCMAKE_INSTALL_PREFIX=$INSTALL_PREFIX \
  -DCMAKE_BUILD_TYPE=Release \
  -DSYSCONFDIR=/etc \
  -DLOCALSTATEDIR=/var && \
make DESTDIR=$INSTALL_DIR install && \
sudo cp -rv $INSTALL_DIR/* / && \
rm -rf $INSTALL_DIR/*
Build Greenbone Vulnerability Manager
Next, download, verify, and build the Greenbone Vulnerability Manager (GVM).
export GVMD_VERSION=23.2.0 && \
curl -f -L https://github.com/greenbone/gvmd/archive/refs/tags/v$GVMD_VERSION.tar.gz -o $SOURCE_DIR/gvmd-$GVMD_VERSION.tar.gz && \
curl -f -L https://github.com/greenbone/gvmd/releases/download/v$GVMD_VERSION/gvmd-$GVMD_VERSION.tar.gz.asc -o $SOURCE_DIR/gvmd-$GVMD_VERSION.tar.gz.asc && \
gpg --verify $SOURCE_DIR/gvmd-$GVMD_VERSION.tar.gz.asc $SOURCE_DIR/gvmd-$GVMD_VERSION.tar.gz
Ensure that the signature from the Greenbone Community Feed is valid.
gpg: Signature made Tue 03 Aug 2021 02:28:53 PM UTC
gpg:                using RSA key 8AE4BE429B60A59B311C2E739823FAA60ED1E580
gpg: Good signature from "Greenbone Community Feed integrity key" [ultimate]
Extract the Greenbone Vulnerability Manager and proceed with the installation.
tar -C $SOURCE_DIR -xvzf $SOURCE_DIR/gvmd-$GVMD_VERSION.tar.gz && \
mkdir -p $BUILD_DIR/gvmd && cd $BUILD_DIR/gvmd && \
cmake $SOURCE_DIR/gvmd-$GVMD_VERSION \
  -DCMAKE_INSTALL_PREFIX=$INSTALL_PREFIX \
  -DCMAKE_BUILD_TYPE=Release \
  -DLOCALSTATEDIR=/var \
  -DSYSCONFDIR=/etc \
  -DGVM_DATA_DIR=/var \
  -DOPENVAS_DEFAULT_SOCKET=/run/ospd/ospd-openvas.sock \
  -DGVM_FEED_LOCK_PATH=/var/lib/gvm/feed-update.lock \
  -DSYSTEMD_SERVICE_DIR=/lib/systemd/system \
  -DPostgreSQL_TYPE_INCLUDE_DIR=/usr/include/postgresql \
  -DLOGROTATE_DIR=/etc/logrotate.d && \
make DESTDIR=$INSTALL_DIR install && \
sudo cp -rv $INSTALL_DIR/* / && \
rm -rf $INSTALL_DIR/*
Build PostgreSQL helper pg-gvm
Proceed to download and build the latest PostgreSQL helper, pg-gvm.
export PG_GVM_VERSION=22.6.4 && \
curl -f -L https://github.com/greenbone/pg-gvm/archive/refs/tags/v$PG_GVM_VERSION.tar.gz -o $SOURCE_DIR/pg-gvm-$PG_GVM_VERSION.tar.gz && \
curl -f -L https://github.com/greenbone/pg-gvm/releases/download/v$PG_GVM_VERSION/pg-gvm-$PG_GVM_VERSION.tar.gz.asc -o $SOURCE_DIR/pg-gvm-$PG_GVM_VERSION.tar.gz.asc && \
gpg --verify $SOURCE_DIR/pg-gvm-$PG_GVM_VERSION.tar.gz.asc $SOURCE_DIR/pg-gvm-$PG_GVM_VERSION.tar.gz
Build pg-gvm.
tar -C $SOURCE_DIR -xvzf $SOURCE_DIR/pg-gvm-$PG_GVM_VERSION.tar.gz && \
mkdir -p $BUILD_DIR/pg-gvm && cd $BUILD_DIR/pg-gvm && \
cmake $SOURCE_DIR/pg-gvm-$PG_GVM_VERSION \
  -DCMAKE_INSTALL_PREFIX=$INSTALL_PREFIX \
  -DCMAKE_BUILD_TYPE=Release \
  -DPostgreSQL_TYPE_INCLUDE_DIR=/usr/include/postgresql && \
make DESTDIR=$INSTALL_DIR install && \
sudo cp -rv $INSTALL_DIR/* / && \
rm -rf $INSTALL_DIR/*
Install Greenbone Security Assistant
Download the web interface Greenbone Security Assistant (GSA).
export GSA_VERSION=23.0.0 && \
curl -f -L https://github.com/greenbone/gsa/releases/download/v$GSA_VERSION/gsa-dist-$GSA_VERSION.tar.gz -o $SOURCE_DIR/gsa-$GSA_VERSION.tar.gz && \
curl -f -L https://github.com/greenbone/gsa/releases/download/v$GSA_VERSION/gsa-dist-$GSA_VERSION.tar.gz.asc -o $SOURCE_DIR/gsa-$GSA_VERSION.tar.gz.asc && \
gpg --verify $SOURCE_DIR/gsa-$GSA_VERSION.tar.gz.asc $SOURCE_DIR/gsa-$GSA_VERSION.tar.gz
Verify the GSA download and ensure that the signature from the Greenbone Community Feed is valid.
gpg: Signature made Tue 03 Aug 2021 02:59:15 PM UTC
gpg:                using RSA key 8AE4BE429B60A59B311C2E739823FAA60ED1E580
gpg: Good signature from "Greenbone Community Feed integrity key" [ultimate]
Create the source directory and extract the pre-built web interface (GSA) to its designated installation target.
mkdir -p $SOURCE_DIR/gsa-$GSA_VERSION && \
tar -C $SOURCE_DIR/gsa-$GSA_VERSION -xvzf $SOURCE_DIR/gsa-$GSA_VERSION.tar.gz && \
mkdir -p $INSTALL_PREFIX/share/gvm/gsad/web/ && \
cp -rv $SOURCE_DIR/gsa-$GSA_VERSION/* $INSTALL_PREFIX/share/gvm/gsad/web/
mkdir -p $SOURCE_DIR/gsa-$GSA_VERSION && \
tar -C $SOURCE_DIR/gsa-$GSA_VERSION -xvzf $SOURCE_DIR/gsa-$GSA_VERSION.tar.gz && \
mkdir -p $INSTALL_PREFIX/share/gvm/gsad/web/ && \
cp -rv $SOURCE_DIR/gsa-$GSA_VERSION/* $INSTALL_PREFIX/share/gvm/gsad/web/
Build Greenbone Security Assistant Daemon
Download and build the HTTP Server Greenbone Security Assistant Daemon (GSAD).
export GSAD_VERSION=22.9.0 && \
curl -f -L https://github.com/greenbone/gsad/archive/refs/tags/v$GSAD_VERSION.tar.gz -o $SOURCE_DIR/gsad-$GSAD_VERSION.tar.gz && \
curl -f -L https://github.com/greenbone/gsad/releases/download/v$GSAD_VERSION/gsad-$GSAD_VERSION.tar.gz.asc -o $SOURCE_DIR/gsad-$GSAD_VERSION.tar.gz.asc && \
gpg --verify $SOURCE_DIR/gsad-$GSAD_VERSION.tar.gz.asc $SOURCE_DIR/gsad-$GSAD_VERSION.tar.gz
Once you've verified that the signature is valid, proceed to build and install GSAD.
tar -C $SOURCE_DIR -xvzf $SOURCE_DIR/gsad-$GSAD_VERSION.tar.gz && \
mkdir -p $BUILD_DIR/gsad && cd $BUILD_DIR/gsad && \
cmake $SOURCE_DIR/gsad-$GSAD_VERSION \
  -DCMAKE_INSTALL_PREFIX=$INSTALL_PREFIX \
  -DCMAKE_BUILD_TYPE=Release \
  -DSYSCONFDIR=/etc \
  -DLOCALSTATEDIR=/var \
  -DGVMD_RUN_DIR=/run/gvmd \
  -DGSAD_RUN_DIR=/run/gsad \
  -DLOGROTATE_DIR=/etc/logrotate.d && \
make DESTDIR=$INSTALL_DIR install && \
sudo cp -rv $INSTALL_DIR/* / && \
rm -rf $INSTALL_DIR/*
Build OpenVAS SMB module
Download and build the OpenVAS SMB module.
WARNING
The OpenVAS Samba module is updated independently, and its version tag may differ from the GVM version.
export OPENVAS_SMB_VERSION=22.5.3 && \
curl -f -L https://github.com/greenbone/openvas-smb/archive/refs/tags/v$OPENVAS_SMB_VERSION.tar.gz -o $SOURCE_DIR/openvas-smb-$OPENVAS_SMB_VERSION.tar.gz && \
curl -f -L https://github.com/greenbone/openvas-smb/releases/download/v$OPENVAS_SMB_VERSION/openvas-smb-v$OPENVAS_SMB_VERSION.tar.gz.asc -o $SOURCE_DIR/openvas-smb-$OPENVAS_SMB_VERSION.tar.gz.asc && \
gpg --verify $SOURCE_DIR/openvas-smb-$OPENVAS_SMB_VERSION.tar.gz.asc $SOURCE_DIR/openvas-smb-$OPENVAS_SMB_VERSION.tar.gz
Verify the SMB module download and ensure that the signature from the Greenbone Community Feed is trusted.
gpg: Signature made Fri 25 Jun 2021 06:36:43 AM UTC
gpg:                using RSA key 8AE4BE429B60A59B311C2E739823FAA60ED1E580
gpg: Good signature from "Greenbone Community Feed integrity key" [ultimate]
Next, extract the files and proceed with the installation.
tar -C $SOURCE_DIR -xvzf $SOURCE_DIR/openvas-smb-$OPENVAS_SMB_VERSION.tar.gz && \
mkdir -p $BUILD_DIR/openvas-smb && cd $BUILD_DIR/openvas-smb && \
cmake $SOURCE_DIR/openvas-smb-$OPENVAS_SMB_VERSION \
  -DCMAKE_INSTALL_PREFIX=$INSTALL_PREFIX \
  -DCMAKE_BUILD_TYPE=Release && \
make DESTDIR=$INSTALL_DIR install && \
sudo cp -rv $INSTALL_DIR/* / && \
rm -rf $INSTALL_DIR/*
Build OpenVAS Scanner
Download and build the openvas-scanner (OpenVAS).
export OPENVAS_SCANNER_VERSION=22.7.9 && \
curl -f -L https://github.com/greenbone/openvas-scanner/archive/refs/tags/v$OPENVAS_SCANNER_VERSION.tar.gz -o $SOURCE_DIR/openvas-scanner-$OPENVAS_SCANNER_VERSION.tar.gz && \
curl -f -L https://github.com/greenbone/openvas-scanner/releases/download/v$OPENVAS_SCANNER_VERSION/openvas-scanner-v$OPENVAS_SCANNER_VERSION.tar.gz.asc -o $SOURCE_DIR/openvas-scanner-$OPENVAS_SCANNER_VERSION.tar.gz.asc && \
gpg --verify $SOURCE_DIR/openvas-scanner-$OPENVAS_SCANNER_VERSION.tar.gz.asc $SOURCE_DIR/openvas-scanner-$OPENVAS_SCANNER_VERSION.tar.gz
Verify the signature output to ensure its authenticity.
gpg: Signature made Tue 03 Aug 2021 12:59:52 PM UTC
gpg:                using RSA key 8AE4BE429B60A59B311C2E739823FAA60ED1E580
gpg: Good signature from "Greenbone Community Feed integrity key" [ultimate]
Build the OpenVAS Scanner.
tar -C $SOURCE_DIR -xvzf $SOURCE_DIR/openvas-scanner-$OPENVAS_SCANNER_VERSION.tar.gz && \
mkdir -p $BUILD_DIR/openvas-scanner && cd $BUILD_DIR/openvas-scanner && \
cmake $SOURCE_DIR/openvas-scanner-$OPENVAS_SCANNER_VERSION \
  -DCMAKE_INSTALL_PREFIX=$INSTALL_PREFIX \
  -DCMAKE_BUILD_TYPE=Release \
  -DSYSCONFDIR=/etc \
  -DLOCALSTATEDIR=/var \
  -DOPENVAS_FEED_LOCK_PATH=/var/lib/openvas/feed-update.lock \
  -DOPENVAS_RUN_DIR=/run/ospd && \
make DESTDIR=$INSTALL_DIR install && \
sudo cp -rv $INSTALL_DIR/* / && \
rm -rf $INSTALL_DIR/*
Build ospd-openvas
Proceed to download ospd-openvas.
export OSPD_OPENVAS_VERSION=22.6.2 && \
curl -f -L https://github.com/greenbone/ospd-openvas/archive/refs/tags/v$OSPD_OPENVAS_VERSION.tar.gz -o $SOURCE_DIR/ospd-openvas-$OSPD_OPENVAS_VERSION.tar.gz && \
curl -f -L https://github.com/greenbone/ospd-openvas/releases/download/v$OSPD_OPENVAS_VERSION/ospd-openvas-v$OSPD_OPENVAS_VERSION.tar.gz.asc -o $SOURCE_DIR/ospd-openvas-$OSPD_OPENVAS_VERSION.tar.gz.asc && \
gpg --verify $SOURCE_DIR/ospd-openvas-$OSPD_OPENVAS_VERSION.tar.gz.asc $SOURCE_DIR/ospd-openvas-$OSPD_OPENVAS_VERSION.tar.gz
Verify signature.
gpg: Signature made Wed 04 Aug 2021 07:13:45 AM UTC
gpg:                using RSA key 8AE4BE429B60A59B311C2E739823FAA60ED1E580
gpg: Good signature from "Greenbone Community Feed integrity key" [ultimate]
Extract the files and begin the installation process.
tar -C $SOURCE_DIR -xvzf $SOURCE_DIR/ospd-openvas-$OSPD_OPENVAS_VERSION.tar.gz && \
cd $SOURCE_DIR/ospd-openvas-$OSPD_OPENVAS_VERSION && \
mkdir -p $INSTALL_DIR/ospd-openvas && \
python3 -m pip install --root=$INSTALL_DIR/ospd-openvas --no-warn-script-location . && \
sudo cp -rv $INSTALL_DIR/ospd-openvas/* /
Build notus-scanner
Download and verify the notus-scanner.
export NOTUS_VERSION=22.6.2 && \
curl -f -L https://github.com/greenbone/notus-scanner/archive/refs/tags/v$NOTUS_VERSION.tar.gz -o $SOURCE_DIR/notus-scanner-$NOTUS_VERSION.tar.gz && \
curl -f -L https://github.com/greenbone/notus-scanner/releases/download/v$NOTUS_VERSION/notus-scanner-v$NOTUS_VERSION.tar.gz.asc -o $SOURCE_DIR/notus-scanner-$NOTUS_VERSION.tar.gz.asc && \
gpg --verify $SOURCE_DIR/notus-scanner-$NOTUS_VERSION.tar.gz.asc $SOURCE_DIR/notus-scanner-$NOTUS_VERSION.tar.gz
Once verified, proceed with the installation.
tar -C $SOURCE_DIR -xvzf $SOURCE_DIR/notus-scanner-$NOTUS_VERSION.tar.gz && \
cd $SOURCE_DIR/notus-scanner-$NOTUS_VERSION && \
mkdir -p $INSTALL_DIR/notus-scanner && \
python3 -m pip install --root=$INSTALL_DIR/notus-scanner --no-warn-script-location . && \
sudo cp -rv $INSTALL_DIR/notus-scanner/* /
Install GVM tools
Install the Greenbone Vulnerability Management Tools, a toolkit that helps remotely control the Greenbone Community Edition.
mkdir -p $INSTALL_DIR/gvm-tools && \
python3 -m pip install --root=$INSTALL_DIR/gvm-tools --no-warn-script-location gvm-tools && \
sudo cp -rv $INSTALL_DIR/gvm-tools/* /
mkdir -p $INSTALL_DIR/gvm-tools && \
python3 -m pip install --root=$INSTALL_DIR/gvm-tools --no-warn-script-location gvm-tools && \
sudo cp -rv $INSTALL_DIR/gvm-tools/* /
Set up the Mosquitto broker
The Mosquitto MQTT broker facilitates communication between ospd-openvas, openvas-scanner, and notus-scanner.
sudo systemctl start mosquitto.service && \
sudo systemctl enable mosquitto.service && \
echo "mqtt_server_uri = localhost:1883\ntable_driven_lsc = yes" | sudo tee -a /etc/openvas/openvas.conf
sudo systemctl start mosquitto.service && \
sudo systemctl enable mosquitto.service && \
echo "mqtt_server_uri = localhost:1883\ntable_driven_lsc = yes" | sudo tee -a /etc/openvas/openvas.conf
Configure Redis
Next configure Redis.
sudo cp $SOURCE_DIR/openvas-scanner-$OPENVAS_SCANNER_VERSION/config/redis-openvas.conf /etc/redis/ && \
sudo chown redis:redis /etc/redis/redis-openvas.conf && \
echo "db_address = /run/redis-openvas/redis.sock" | sudo tee -a /etc/openvas/openvas.conf
sudo cp $SOURCE_DIR/openvas-scanner-$OPENVAS_SCANNER_VERSION/config/redis-openvas.conf /etc/redis/ && \
sudo chown redis:redis /etc/redis/redis-openvas.conf && \
echo "db_address = /run/redis-openvas/redis.sock" | sudo tee -a /etc/openvas/openvas.conf
Add Redis to the GVM group.
sudo usermod -aG redis gvm
sudo usermod -aG redis _gvm
Start the Redis server and enable it as a startup service.
sudo systemctl start redis-server@openvas.service && \
sudo systemctl enable redis-server@openvas.service
sudo systemctl start redis-server@openvas.service && \
sudo systemctl enable redis-server@openvas.service
Proceed to set up the correct permissions.
sudo mkdir -p /var/lib/notus && \
sudo mkdir -p /run/gvmd && \
sudo mkdir -p /var/lib/notus && \
sudo mkdir -p /run/notus-scanner && \
sudo mkdir -p /run/gvmd && \
sudo chown -R gvm:gvm /var/lib/gvm && \
sudo chown -R gvm:gvm /var/lib/openvas && \
sudo chown -R gvm:gvm /var/lib/notus && \
sudo chown -R gvm:gvm /var/log/gvm && \
sudo chown -R gvm:gvm /run/gvmd && \
sudo chmod -R g+srw /var/lib/gvm && \
sudo chmod -R g+srw /var/lib/openvas && \
sudo chmod -R g+srw /var/log/gvm
sudo mkdir -p /var/lib/notus && \
sudo mkdir -p /run/gvmd && \
sudo mkdir -p /var/lib/notus && \
sudo mkdir -p /run/notus-scanner && \
sudo mkdir -p /run/gvmd && \
sudo chown -R _gvm:_gvm /var/lib/gvm && \
sudo chown -R _gvm:_gvm /var/lib/openvas && \
sudo chown -R _gvm:_gvm /var/lib/notus && \
sudo chown -R _gvm:_gvm /var/log/gvm && \
sudo chown -R _gvm:_gvm /run/gvmd && \
sudo chmod -R g+srw /var/lib/gvm && \
sudo chmod -R g+srw /var/lib/openvas && \
sudo chmod -R g+srw /var/log/gvm
You also need to adjust the permissions for feed synchronization.
sudo chown gvm:gvm /usr/local/sbin/gvmd && \
sudo chmod 6750 /usr/local/sbin/gvmd
sudo chown _gvm:_gvm /usr/local/sbin/gvmd && \
sudo chmod 6750 /usr/local/sbin/gvmd
Feed validation.
export GNUPGHOME=/tmp/openvas-gnupg && \
mkdir -p $GNUPGHOME && \
gpg --import /tmp/GBCommunitySigningKey.asc && \
echo "8AE4BE429B60A59B311C2E739823FAA60ED1E580:6:" > /tmp/ownertrust.txt && \
gpg --import-ownertrust < /tmp/ownertrust.txt && \
export OPENVAS_GNUPG_HOME=/etc/openvas/gnupg && \
sudo mkdir -p $OPENVAS_GNUPG_HOME && \
sudo cp -r /tmp/openvas-gnupg/* $OPENVAS_GNUPG_HOME/ && \
sudo chown -R gvm:gvm $OPENVAS_GNUPG_HOME
export GNUPGHOME=/tmp/openvas-gnupg && \
mkdir -p $GNUPGHOME && \
gpg --import /tmp/GBCommunitySigningKey.asc && \
echo "8AE4BE429B60A59B311C2E739823FAA60ED1E580:6:" > /tmp/ownertrust.txt && \
gpg --import-ownertrust < /tmp/ownertrust.txt && \
export OPENVAS_GNUPG_HOME=/etc/openvas/gnupg && \
sudo mkdir -p $OPENVAS_GNUPG_HOME && \
sudo cp -r /tmp/openvas-gnupg/* $OPENVAS_GNUPG_HOME/ && \
sudo chown -R _gvm:_gvm $OPENVAS_GNUPG_HOME
Configure and add all users of the gvm group to run the openvas-scanner application as the root user via sudo.
sudo visudo
sudo visudo
# Allow members of group sudo to execute any command
%sudo   ALL=(ALL:ALL) ALL

# allow users of the gvm group run openvas
%gvm ALL = NOPASSWD: /usr/local/sbin/openvas
# Allow members of group sudo to execute any command
%sudo   ALL=(ALL:ALL) ALL

# allow users of the gvm group run openvas
%_gvm ALL = NOPASSWD: /usr/local/sbin/openvas
Configure PostgreSQL database
Start the PostgreSQL service.
sudo systemctl start postgresql@14-main.service
sudo systemctl start postgresql@15-main.service
Create a PostgreSQL user and database.
sudo -u postgres bash
cd
createuser -DRS gvm
createdb -O gvm gvmd
psql gvmd
sudo -u postgres bash
createuser -DRS _gvm
createdb -O _gvm gvmd
psql gvmd
Set up correct permissions and create database extensions.
gvmd=# create role dba with superuser noinherit;
gvmd=# grant dba to gvm;
gvmd=# create extension "uuid-ossp";
gvmd=# create extension "pgcrypto";
gvmd=# exit
exit
gvmd=# create role dba with superuser noinherit;
gvmd=# grant dba to _gvm;
gvmd=# create extension "uuid-ossp";
gvmd=# create extension "pgcrypto";
gvmd=# exit
exit
Create Admin user
Create the administration user for the Greenbone Security Assistant.
INFO
Please change the default password by logging in using the Greenbone Security Assistant (GSA).
Before creating the administrator, ensure that you have exited the PostgreSQL session and reloaded the dynamic loader cache.
sudo ldconfig
sudo ldconfig
Once you've reloaded the dynamic loader cache, proceed with the user creation.
/usr/local/sbin/gvmd --create-user=admin --password=admin
User created.
sudo gvmd --create-user=admin --password=admin
User created.
Retrieve the administrator's UUID.
/usr/local/sbin/gvmd --get-users --verbose
admin 0279ba6c-391a-472f-8cbd-1f6eb808823b
sudo gvmd --get-users --verbose
admin 0279ba6c-391a-472f-8cbd-1f6eb808823b
Use the administration UUID to modify the gvmd settings. Remember to replace "UUID_HERE" with your actual UUID as the value option.
/usr/local/sbin/gvmd --modify-setting 78eceaec-3385-11ea-b237-28d24461215b --value UUID_HERE
sudo gvmd --modify-setting 78eceaec-3385-11ea-b237-28d24461215b --value UUID_HERE
Install greenbone-feed-sync
Install the new greenbone-feed-sync, which replaces the old approach of synchronizing the data (VT, SCAP, CERT, and GVMD) individually.
mkdir -p $INSTALL_DIR/greenbone-feed-sync && \
python3 -m pip install --root=$INSTALL_DIR/greenbone-feed-sync --no-warn-script-location greenbone-feed-sync && \
sudo cp -rv $INSTALL_DIR/greenbone-feed-sync/* /
mkdir -p $INSTALL_DIR/greenbone-feed-sync && \
python3 -m pip install --root=$INSTALL_DIR/greenbone-feed-sync --no-warn-script-location greenbone-feed-sync && \
sudo cp -rv $INSTALL_DIR/greenbone-feed-sync/* /
Greenbone Feed synchronisation
Synchronize the Greenbone Community feeds.
WARNING
This may take awhile.
sudo /usr/local/bin/greenbone-feed-sync
sudo /usr/local/bin/greenbone-feed-sync
Set up systemd
Create the systemd service script for ospd-openvas. For Ubuntu, specify the address of the MQTT broker for the server host.
cat << EOF > $BUILD_DIR/ospd-openvas.service
[Unit]
Description=OSPd Wrapper for the OpenVAS Scanner (ospd-openvas)
Documentation=man:ospd-openvas(8) man:openvas(8)
After=network.target networking.service redis-server@openvas.service
Wants=redis-server@openvas.service
ConditionKernelCommandLine=!recovery

[Service]
Type=exec
User=gvm
Group=gvm
RuntimeDirectory=ospd
RuntimeDirectoryMode=2775
PIDFile=/run/ospd/ospd-openvas.pid
ExecStart=/usr/local/bin/ospd-openvas --foreground --unix-socket /run/ospd/ospd-openvas.sock --pid-file /run/ospd/ospd-openvas.pid --log-file /var/log/gvm/ospd-openvas.log --lock-file-dir /var/lib/openvas --socket-mode 0o770 --mqtt-broker-address 192.168.0.1 --mqtt-broker-port 1883 --notus-feed-dir /var/lib/notus/advisories
SuccessExitStatus=SIGKILL
Restart=always
RestartSec=60

[Install]
WantedBy=multi-user.target
EOF
cat << EOF > $BUILD_DIR/ospd-openvas.service
[Unit]
Description=OSPd Wrapper for the OpenVAS Scanner (ospd-openvas)
Documentation=man:ospd-openvas(8) man:openvas(8)
After=network.target networking.service redis-server@openvas.service
Wants=redis-server@openvas.service
ConditionKernelCommandLine=!recovery

[Service]
Type=exec
User=_gvm
Group=_gvm
RuntimeDirectory=ospd
RuntimeDirectoryMode=2775
PIDFile=/run/ospd/ospd-openvas.pid
ExecStart=/usr/local/bin/ospd-openvas --foreground --unix-socket /run/ospd/ospd-openvas.sock --pid-file /run/ospd/ospd-openvas.pid --log-file /var/log/gvm/ospd-openvas.log --lock-file-dir /var/lib/openvas --socket-mode 0o770 --mqtt-broker-address 127.0.0.1 --mqtt-broker-port 1883 --notus-feed-dir /var/lib/notus/advisories
SuccessExitStatus=SIGKILL
Restart=always
RestartSec=60

[Install]
WantedBy=multi-user.target
EOF
Copy the startup script to your system's manager directory.
sudo cp $BUILD_DIR/ospd-openvas.service /etc/systemd/system/
sudo cp $BUILD_DIR/ospd-openvas.service /etc/systemd/system/
Create the systemd service script for notus-scanner.
cat << EOF > $BUILD_DIR/notus-scanner.service
[Unit]
Description=Notus Scanner
Documentation=https://github.com/greenbone/notus-scanner
After=mosquitto.service
Wants=mosquitto.service
ConditionKernelCommandLine=!recovery

[Service]
Type=exec
User=gvm
RuntimeDirectory=notus-scanner
RuntimeDirectoryMode=2775
PIDFile=/run/notus-scanner/notus-scanner.pid
ExecStart=/usr/local/bin/notus-scanner --foreground --products-directory /var/lib/notus/products --log-file /var/log/gvm/notus-scanner.log
SuccessExitStatus=SIGKILL
Restart=always
RestartSec=60

[Install]
WantedBy=multi-user.target
EOF
cat << EOF > $BUILD_DIR/notus-scanner.service
[Unit]
Description=Notus Scanner
Documentation=https://github.com/greenbone/notus-scanner
After=mosquitto.service
Wants=mosquitto.service
ConditionKernelCommandLine=!recovery

[Service]
Type=exec
User=_gvm
RuntimeDirectory=notus-scanner
RuntimeDirectoryMode=2775
PIDFile=/run/notus-scanner/notus-scanner.pid
ExecStart=/usr/local/bin/notus-scanner --foreground --products-directory /var/lib/notus/products --log-file /var/log/gvm/notus-scanner.log
SuccessExitStatus=SIGKILL
Restart=always
RestartSec=60

[Install]
WantedBy=multi-user.target
EOF
Copy the startup script to your system's manager directory.
sudo cp $BUILD_DIR/notus-scanner.service /etc/systemd/system/
sudo cp $BUILD_DIR/notus-scanner.service /etc/systemd/system/
Create the Greenbone Manager startup script.
cat << EOF > $BUILD_DIR/gvmd.service
[Unit]
Description=Greenbone Vulnerability Manager daemon (gvmd)
After=network.target networking.service postgresql.service ospd-openvas.service
Wants=postgresql.service ospd-openvas.service
Documentation=man:gvmd(8)
ConditionKernelCommandLine=!recovery

[Service]
Type=exec
User=gvm
Group=gvm
PIDFile=/run/gvmd/gvmd.pid
RuntimeDirectory=gvmd
RuntimeDirectoryMode=2775
ExecStart=/usr/local/sbin/gvmd --foreground --osp-vt-update=/run/ospd/ospd-openvas.sock --listen-group=gvm
Restart=always
TimeoutStopSec=10

[Install]
WantedBy=multi-user.target
EOF
cat << EOF > $BUILD_DIR/gvmd.service
[Unit]
Description=Greenbone Vulnerability Manager daemon (gvmd)
After=network.target networking.service postgresql.service ospd-openvas.service
Wants=postgresql.service ospd-openvas.service
Documentation=man:gvmd(8)
ConditionKernelCommandLine=!recovery

[Service]
Type=exec
User=_gvm
Group=_gvm
PIDFile=/run/gvmd/gvmd.pid
RuntimeDirectory=gvmd
RuntimeDirectoryMode=2775
ExecStart=/usr/local/sbin/gvmd --foreground --osp-vt-update=/run/ospd/ospd-openvas.sock --listen-group=_gvm
Restart=always
TimeoutStopSec=10

[Install]
WantedBy=multi-user.target
EOF
Copy the startup script to your system's manager directory.
sudo cp $BUILD_DIR/gvmd.service /etc/systemd/system/
sudo cp $BUILD_DIR/gvmd.service /etc/systemd/system/
Create the script for the web interface Greenbone Security Assistant (GSA), remembering to define your IP address for GSA.
cat << EOF > $BUILD_DIR/gsad.service
[Unit]
Description=Greenbone Security Assistant daemon (gsad)
Documentation=man:gsad(8) https://www.greenbone.net
After=network.target gvmd.service
Wants=gvmd.service

[Service]
Type=exec
User=gvm
Group=gvm
RuntimeDirectory=gsad
RuntimeDirectoryMode=2775
PIDFile=/run/gsad/gsad.pid
ExecStart=/usr/local/sbin/gsad --foreground --listen=192.168.0.1 --port=9392 --http-only
Restart=always
TimeoutStopSec=10

[Install]
WantedBy=multi-user.target
Alias=greenbone-security-assistant.service
EOF
cat << EOF > $BUILD_DIR/gsad.service

[Unit]
Description=Greenbone Security Assistant daemon (gsad)
Documentation=man:gsad(8) https://www.greenbone.net
After=network.target gvmd.service
Wants=gvmd.service

[Service]
Type=exec
User=_gvm
Group=_gvm
RuntimeDirectory=gsad
RuntimeDirectoryMode=2775
PIDFile=/run/gsad/gsad.pid
ExecStart=/usr/local/sbin/gsad --foreground --listen=192.168.0.1 --port=9392 --http-only
Restart=always
TimeoutStopSec=10

[Install]
WantedBy=multi-user.target
Alias=greenbone-security-assistant.service
EOF
Copy the startup script to your system's manager directory.
sudo cp $BUILD_DIR/gsad.service /etc/systemd/system/
sudo cp $BUILD_DIR/gsad.service /etc/systemd/system/
Enable and start services
To enable the created startup scripts, reload the system control daemon.
sudo systemctl daemon-reload
sudo systemctl daemon-reload
Enable each of the services.
sudo systemctl enable notus-scanner
sudo systemctl enable ospd-openvas
sudo systemctl enable gvmd
sudo systemctl enable gsad
sudo systemctl enable notus-scanner
sudo systemctl enable ospd-openvas
sudo systemctl enable gvmd
sudo systemctl enable gsad
Next start each service.
TIP
If any of the services do not start for some reason, you can use, for example, journalctl -u notus-scanner.service to view the full trace.
sudo systemctl start ospd-openvas
sudo systemctl start notus-scanner
sudo systemctl start gvmd
sudo systemctl start gsad
sudo systemctl start ospd-openvas
sudo systemctl start notus-scanner
sudo systemctl start gvmd
sudo systemctl start gsad
WARNING
Remember that even though the initial startup of the services are returned immediately, it make take several minutes or even hours for the services to be ready. For more information visit GVM official docs.
You can check the current status of each service by running the commands below.
sudo systemctl status ospd-openvas.service
sudo systemctl status ospd-openvas.service
● ospd-openvas.service - OSPd Wrapper for the OpenVAS Scanner (ospd-openvas)
     Loaded: loaded (/etc/systemd/system/ospd-openvas.service; enabled; vendor preset: enabled)
     Active: active (running) since Mon 2021-10-11 18:22:39 UTC; 5min ago
       Docs: man:ospd-openvas(8)
             man:openvas(8)
    Process: 37213 ExecStart=/usr/local/bin/ospd-openvas --unix-socket /run/ospd/ospd-openvas.sock --pid-file /run/ospd/ospd-openvas.pid --log-file /var/log/gvm/ospd-openvas.log --lock-file-dir /var/lib/openvas ->
   Main PID: 37228 (ospd-openvas)
      Tasks: 6 (limit: 2278)
     Memory: 16.5M
     CGroup: /system.slice/ospd-openvas.service
             ├─37228 /usr/bin/python3 /usr/local/bin/ospd-openvas --unix-socket /run/ospd/ospd-openvas.sock --pid-file /run/ospd/ospd-openvas.pid --log-file /var/log/gvm/ospd-openvas.log --lock-file-dir /var/lib/>
             ├─37230 /usr/bin/python3 /usr/local/bin/ospd-openvas --unix-socket /run/ospd/ospd-openvas.sock --pid-file /run/ospd/ospd-openvas.pid --log-file /var/log/gvm/ospd-openvas.log --lock-file-dir /var/lib/>
             ├─37297 openvas --update-vt-info
             └─37300 openvas: Reloaded 43550 of 77138 NVTs (56% / ETA: 04:25)

Oct 11 18:22:37 server@libellux systemd[1]: Starting OSPd Wrapper for the OpenVAS Scanner (ospd-openvas)...
Oct 11 18:22:39 server@libellux systemd[1]: Started OSPd Wrapper for the OpenVAS Scanner (ospd-openvas).
sudo systemctl status gvmd.service
sudo systemctl status gvmd.service
Synchronizing the SCAP database is typically time-consuming, so please be patient and refrain from restarting your server.
● gvmd.service - Greenbone Vulnerability Manager daemon (gvmd)
     Loaded: loaded (/etc/systemd/system/gvmd.service; enabled; vendor preset: enabled)
     Active: active (running) since Mon 2021-10-11 18:22:46 UTC; 8min ago
       Docs: man:gvmd(8)
    Process: 37240 ExecStart=/usr/local/sbin/gvmd --osp-vt-update=/run/ospd/ospd-openvas.sock --listen-group=gvm (code=exited, status=0/SUCCESS)
   Main PID: 37251 (gvmd)
      Tasks: 3 (limit: 2278)
     Memory: 1.6G
     CGroup: /system.slice/gvmd.service
             ├─37251 gvmd: Waiting for incoming connections
             ├─37272 gpg-agent --homedir /var/lib/gvm/gvmd/gnupg --use-standard-socket --daemon
             └─37622 gvmd: Syncing SCAP: Updating CPEs

Oct 11 18:22:43 server@libellux systemd[1]: Starting Greenbone Vulnerability Manager daemon (gvmd)...
sudo systemctl status gsad.service
sudo systemctl status gsad.service
● gsad.service - Greenbone Security Assistant daemon (gsad)
     Loaded: loaded (/etc/systemd/system/gsad.service; enabled; vendor preset: enabled)
     Active: active (running) since Mon 2021-10-11 18:50:15 UTC; 1min 11s ago
       Docs: man:gsad(8)
             https://www.greenbone.net
    Process: 38710 ExecStart=/usr/local/sbin/gsad --listen=192.168.0.1 --port=9392 (code=exited, status=0/SUCCESS)
   Main PID: 38715
      Tasks: 8 (limit: 2278)
     Memory: 2.1M
     CGroup: /system.slice/gsad.service
             └─38714 /usr/local/sbin/gsad --listen=192.168.0.1 --port=9392

Oct 11 18:50:12 server@libellux systemd[1]: Starting Greenbone Security Assistant daemon (gsad)...
Oct 11 18:50:15 server@libellux systemd[1]: Started Greenbone Security Assistant daemon (gsad).
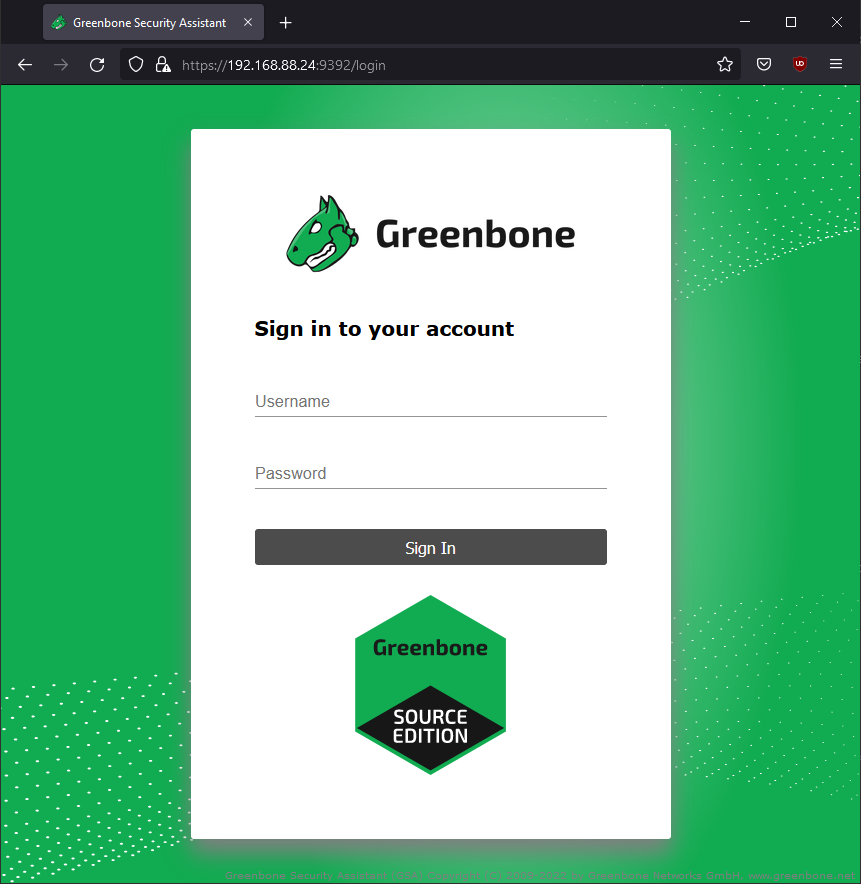
Login at your localhost, for example http://192.168.0.1:9392 with the username admin and the chosen password.
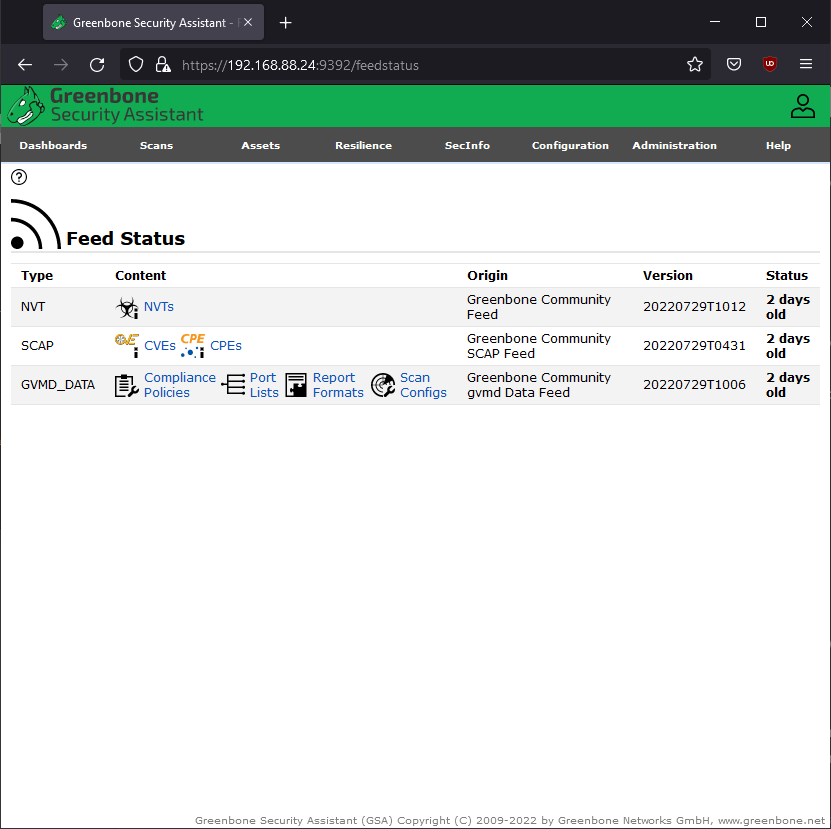
Once logged in, go to the Administration tab and select Feed Status. You'll see that the update is in progress.
You may check the gvmd logs in real-time to see what updates are being made.
server@ubuntu:~$ sudo tail -f /var/log/gvm/gvmd.log
server@rocky:~$
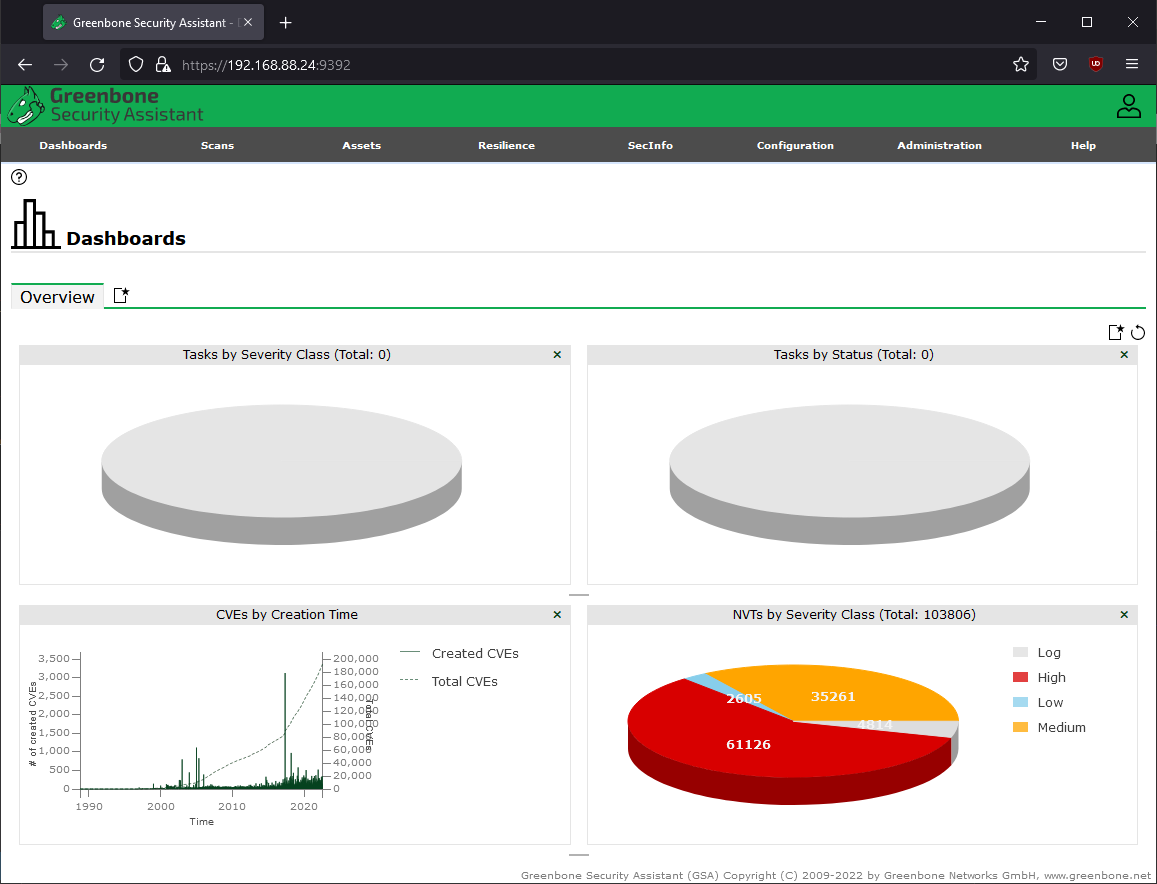
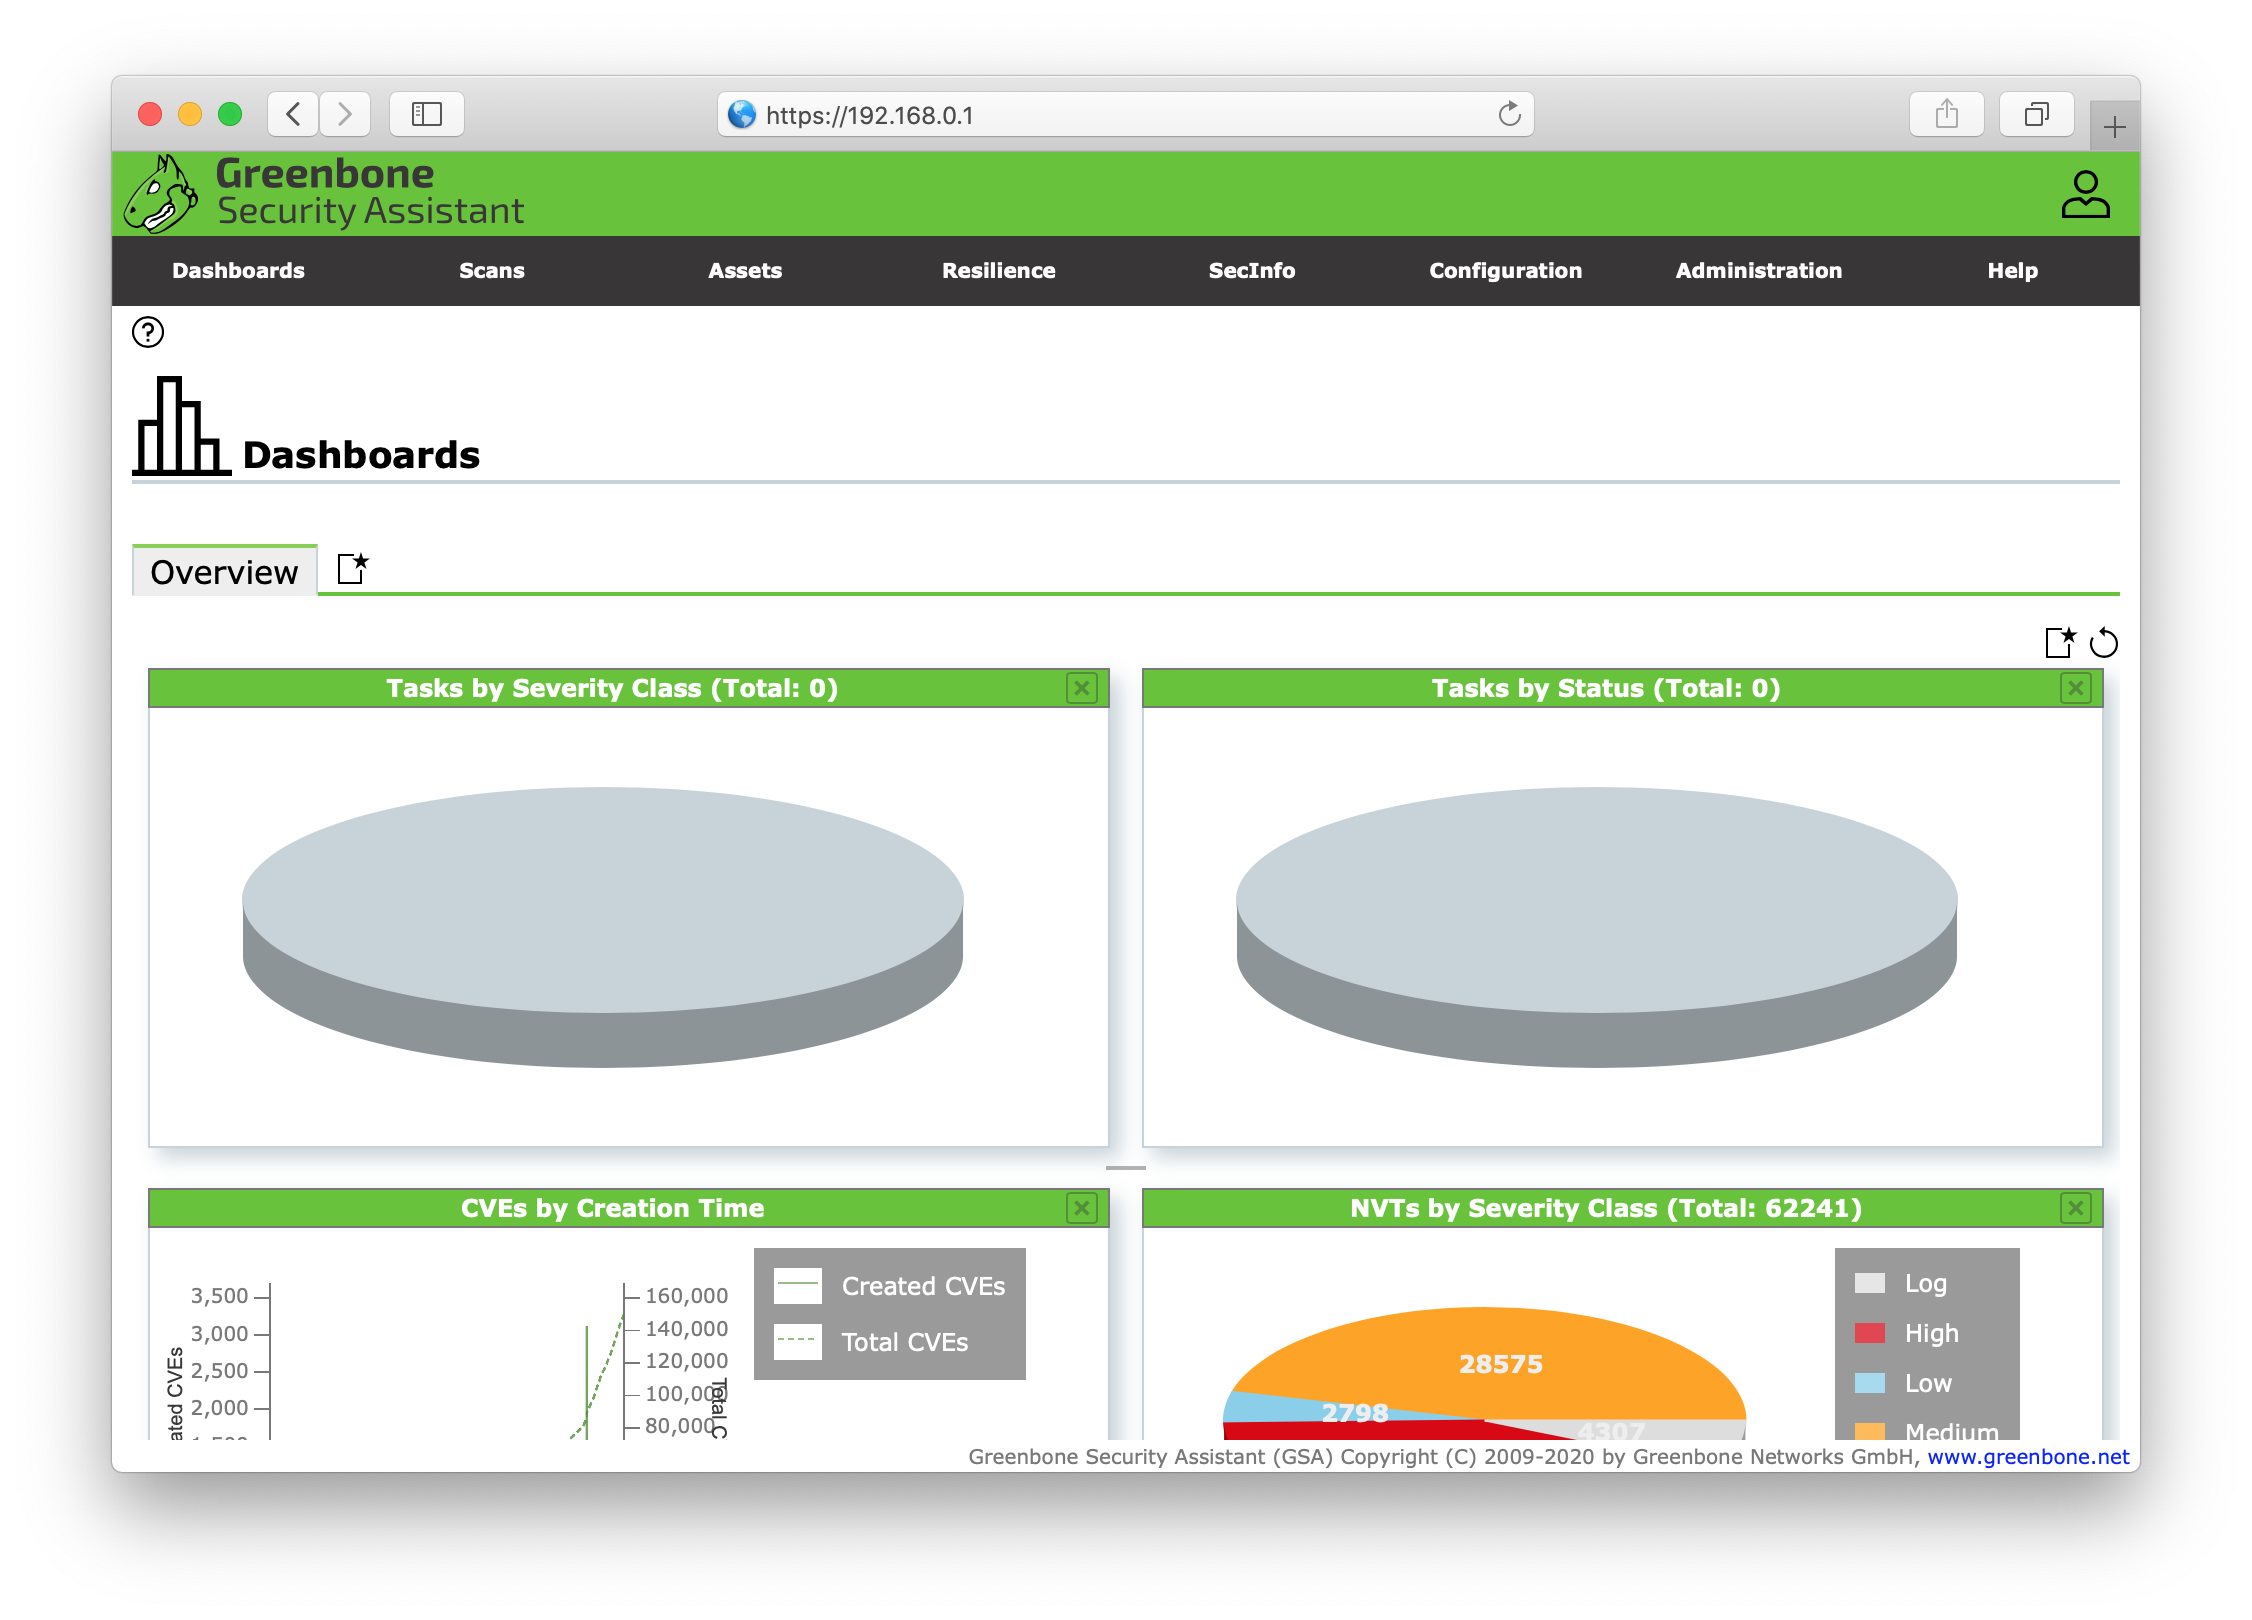
When the status changed to current in the Feed status, go to the dashboard, and it will be populated with CVEs sorted by creation time and NVTs sorted by severity class.
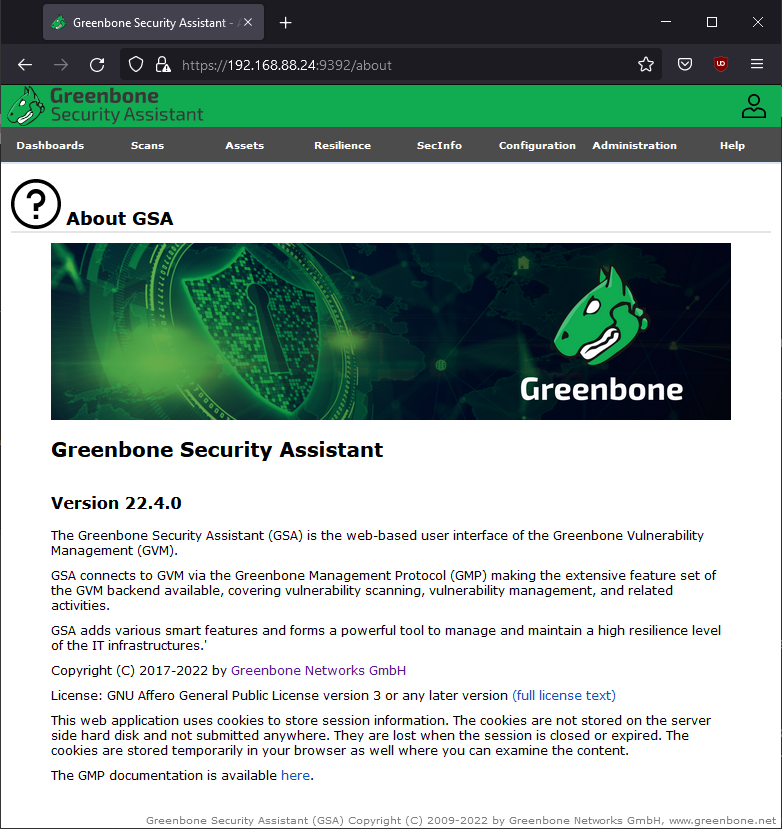
You may also confirm the current version of GSA. Go to the Help tab and select About.
To run basic vulnerability scans and get a feel for how OpenVAS works, check the Running vulnerability scans section.
Install GVM 21.04 Atomicorp non-sponsored
Atomicorp GVM 21.04 package supports Redhat, Rocky, Centos or Fedora Linux platforms. Atomicorp GVM package.
Check if SELinux is enabled.
server@rocky:~$ sestatus
SELinux status:                 enabled
SELinuxfs mount:                /sys/fs/selinux
SELinux root directory:         /etc/selinux
Loaded policy name:             targeted
Current mode:                   enforcing
Mode from config file:          enforcing
If enabled proceed to disable SELinux by running the command below.
server@rocky:~$ sudo setenforce 0
server@rocky:~$ sudo nano /etc/selinux/config
Update the SELinux configuration file and set SELINUX to disabled.
# This file controls the state of SELinux on the system.
# SELINUX= can take one of these three values:
#     enforcing - SELinux security policy is enforced.
#     permissive - SELinux prints warnings instead of enforcing.
#     disabled - No SELinux policy is loaded.
SELINUX=disabled
Save and reboot the system.
server@rocky:~$ sudo shutdown -r now
Once the system rebooted, make sure that SELinux has been disabled
server@rocky:~$ sestatus
SELinux status:                 disabled
Continue and download the Atomicorp installer.
server@rocky:~$ wget -q -O - https://updates.atomicorp.com/installers/atomic | sudo sh

For supported software packages please contact us at:

  sales@atomicorp.com

Do you agree to these terms? (yes/no) [Default: yes] yes
Enable repo by default? (yes/no) [Default: yes]: yes
Enable PowerTools and install extra packages.
TIP
Only required for Redhat, Rocky and CentOS.
server@centos:~$ sudo yum config-manager --set-enabled PowerTools
server@centos:~$ sudo yum install epel-release
Proceed and install GVM.
server@rocky:~$ sudo yum install gvm
Finally run the GVM configuration script to setup GVM (this might take awhile).
server@rocky:~$ sudo gvm-setup
Once the GVM setup has been complete, proceed to set the administrator password.
WARNING
Do not use special characters in the password.
Updating OpenVAS Manager certificates: Complete

GVMD startup: Done

Set the GSAD admin users password.
The admin user is used to configure accounts,
Update NVT's manually, and manage roles.

Enter Administrator Password:
Verify Administrator Password:

Setup complete
  Log in to GSAD at https://localhost
Login at your localhost e.g. https://192.168.0.1 with the username admin and the chosen password.
Running vulnerability scans
There are several approaches on how to configure and run tasks (scans) toward your targets (hosts) in GVM. In this tutorial we will go through how to run the more basic tasks. We will do both unauthenticated scans, where we do not grant GVM SSH access to our target, and authenticated scans to help identify internal server vulnerabilites or misconfigurations.
Unauthenticated scan
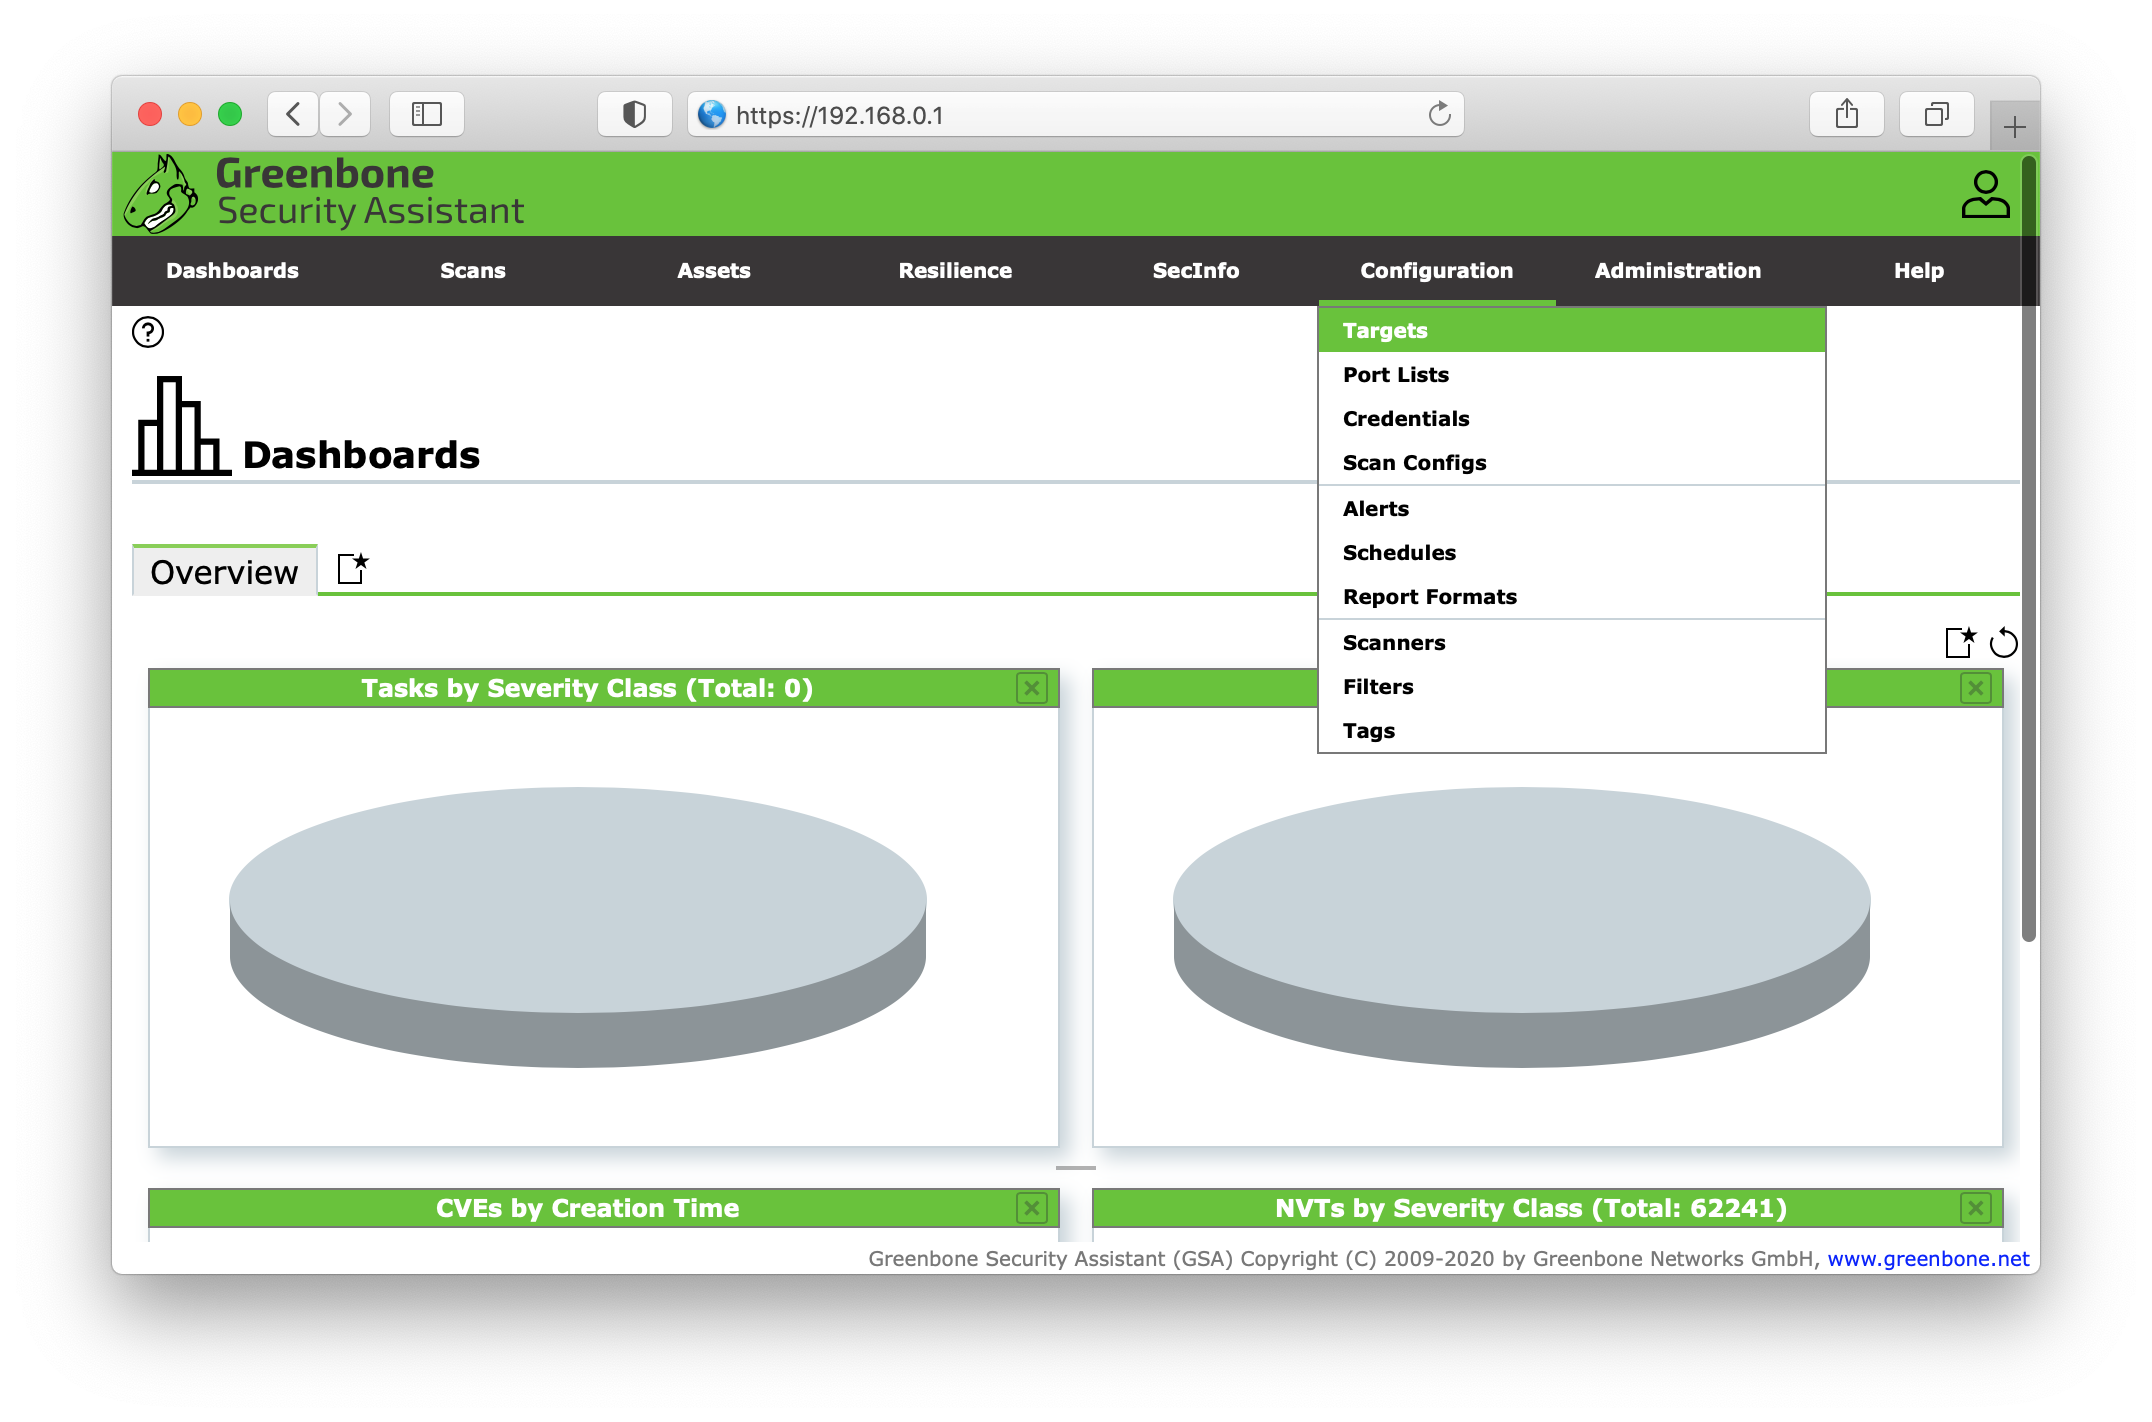
Login to the Greenbone Security Assistant (GSA) e.g. https://192.168.0.1. Once logged in we will add our first target. Go the the Configuration menu in the top navigation and select Targets.
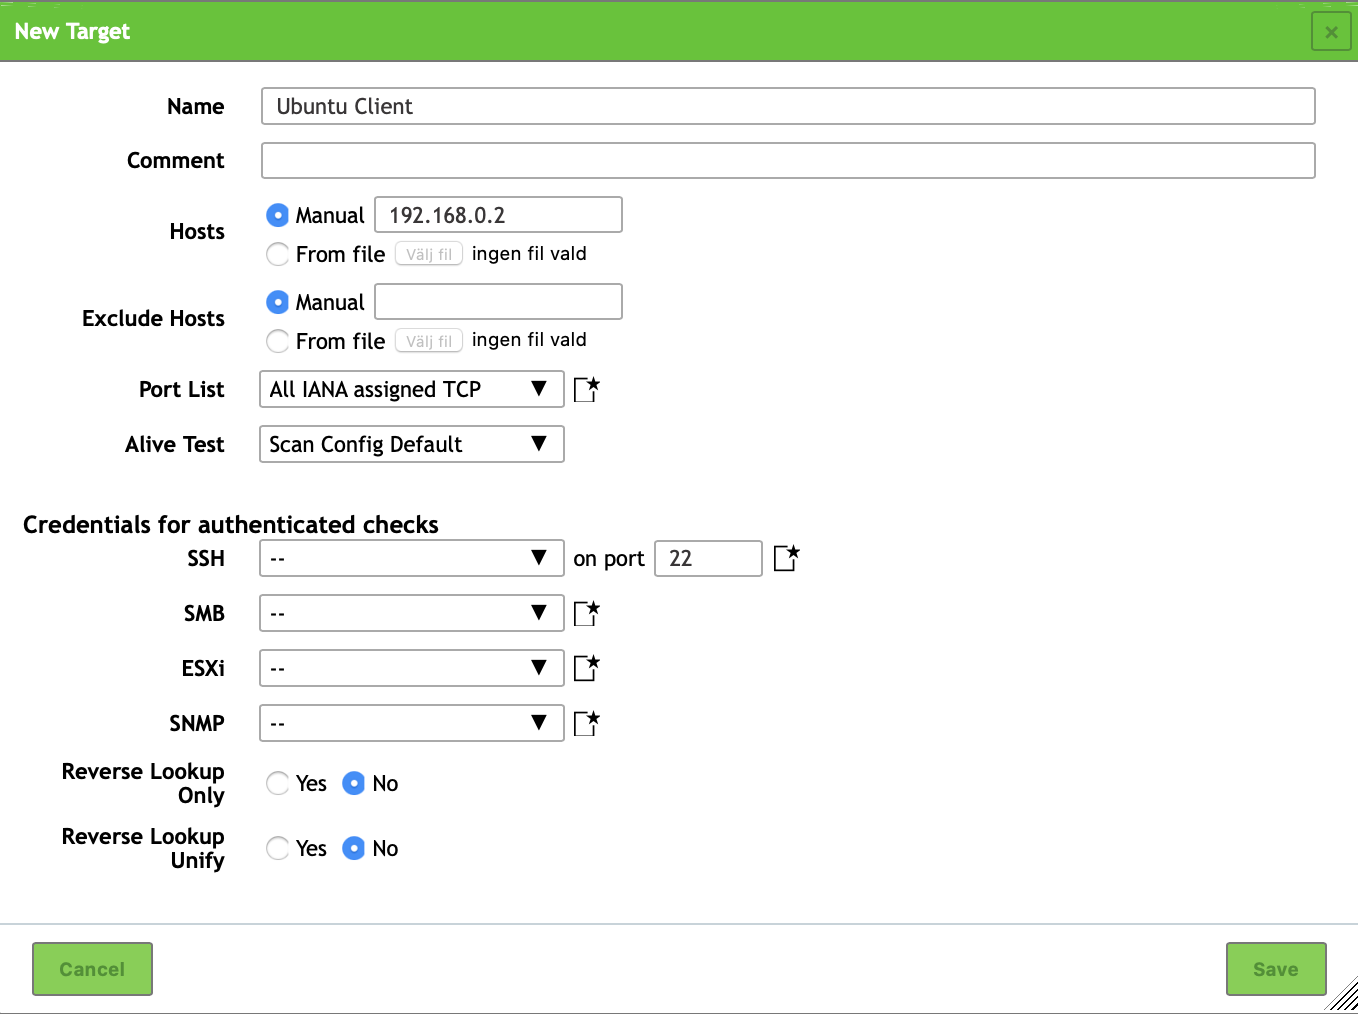
In the top left corner of the Targets view there's a starred document icon, click and select to create a New Target. Fill in the name of the target server e.g. Ubuntu Client and its IP address 192.168.0.2. Leave the rest of the settings in default.
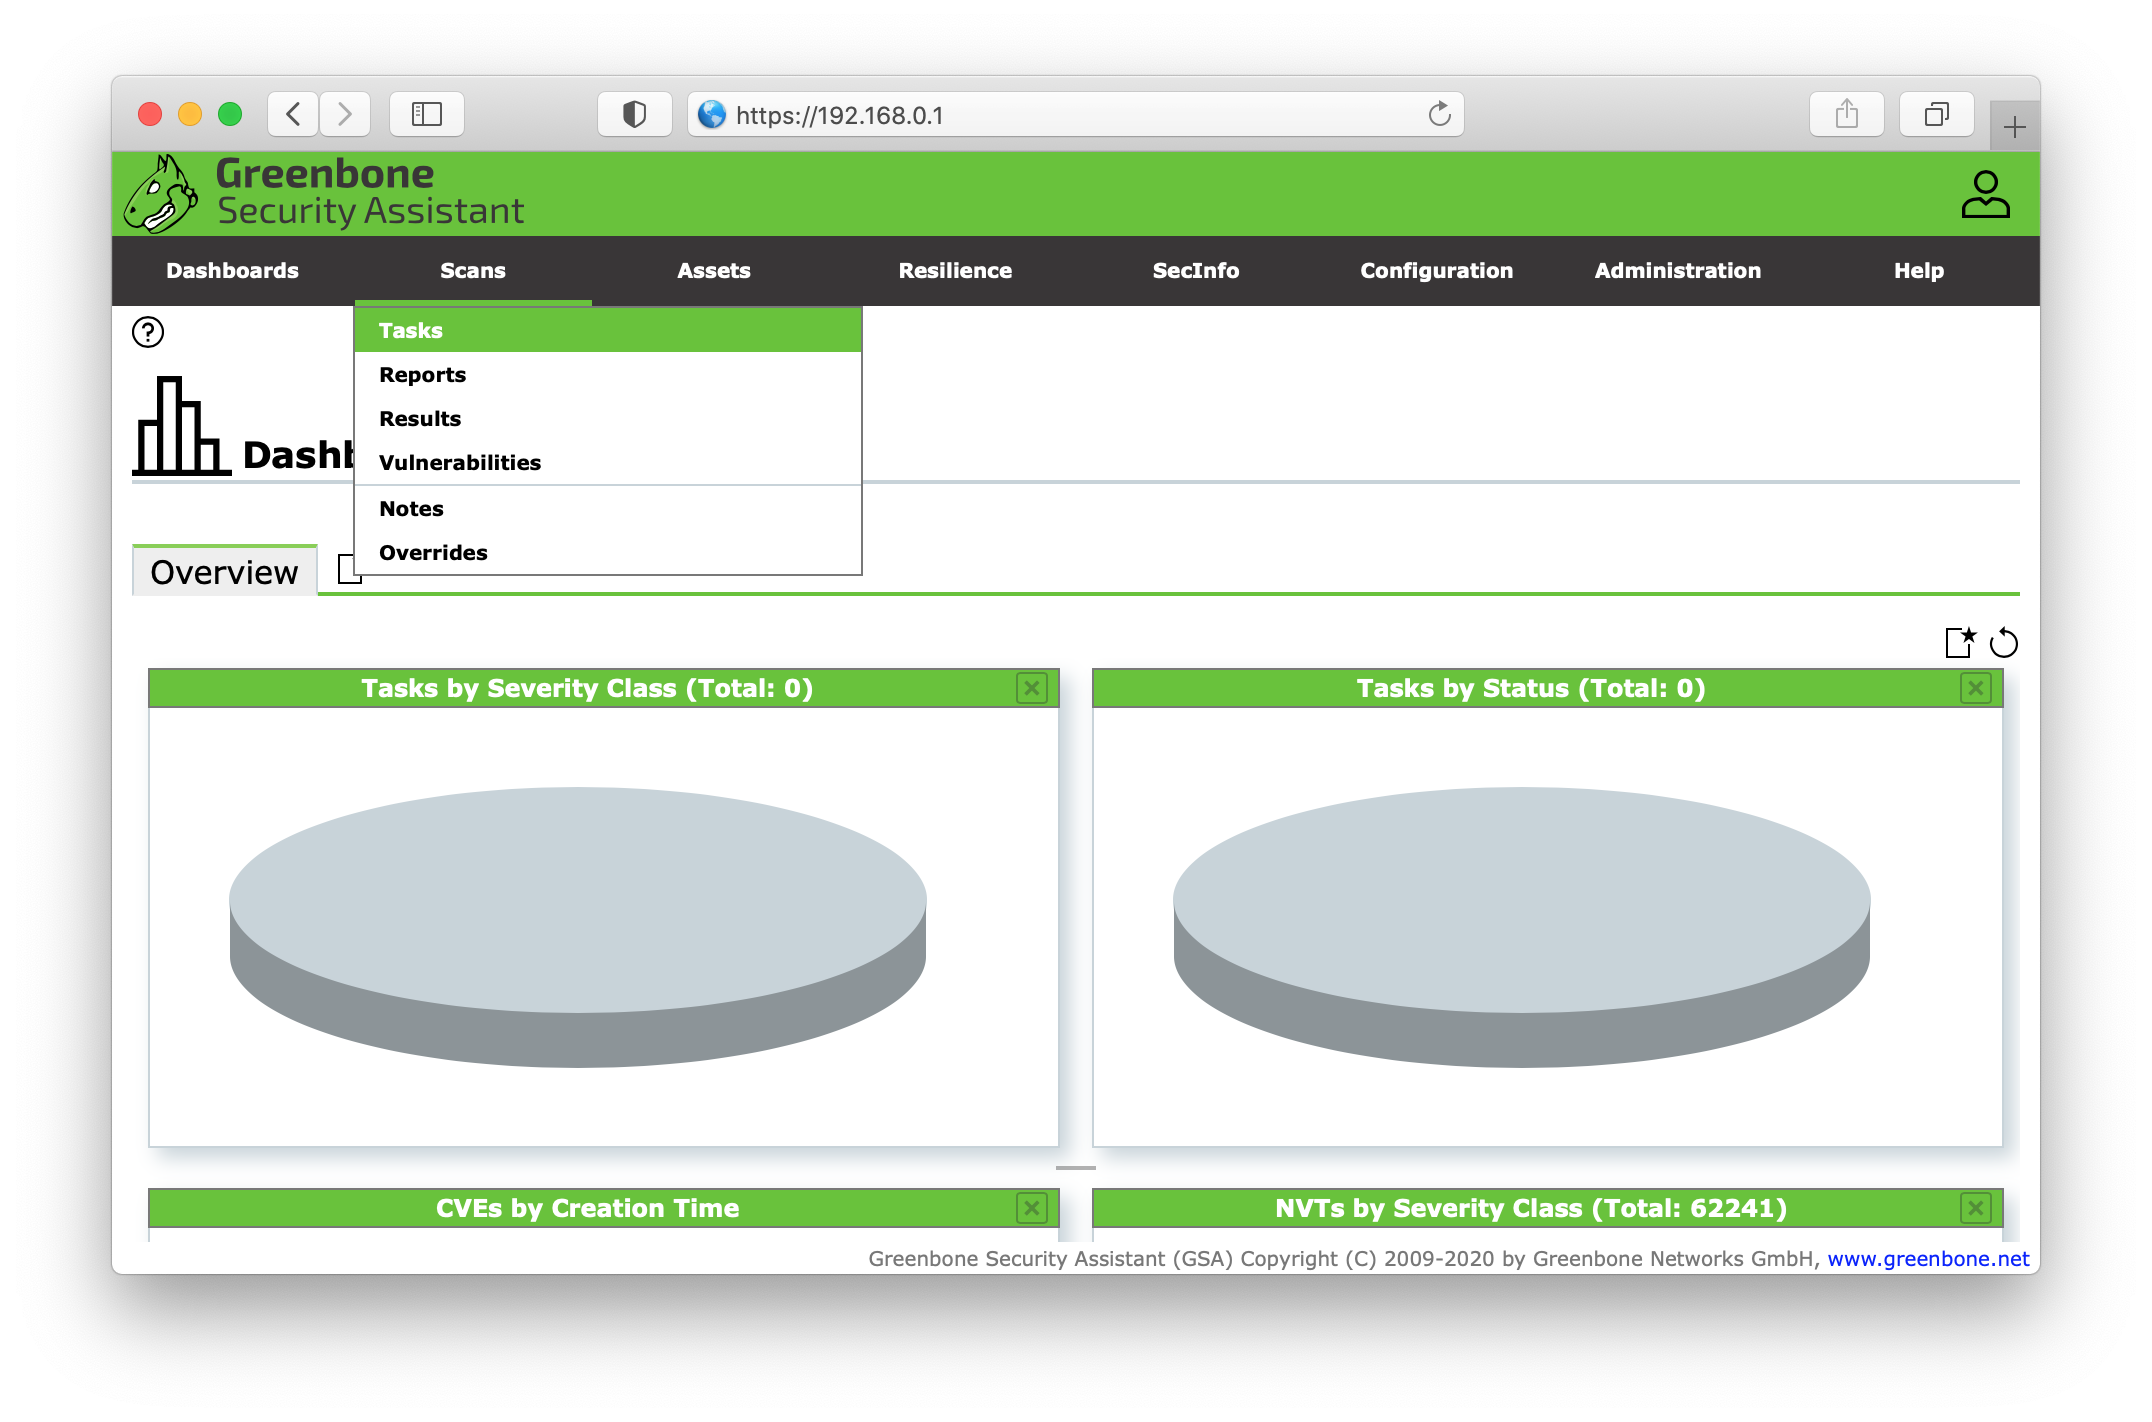
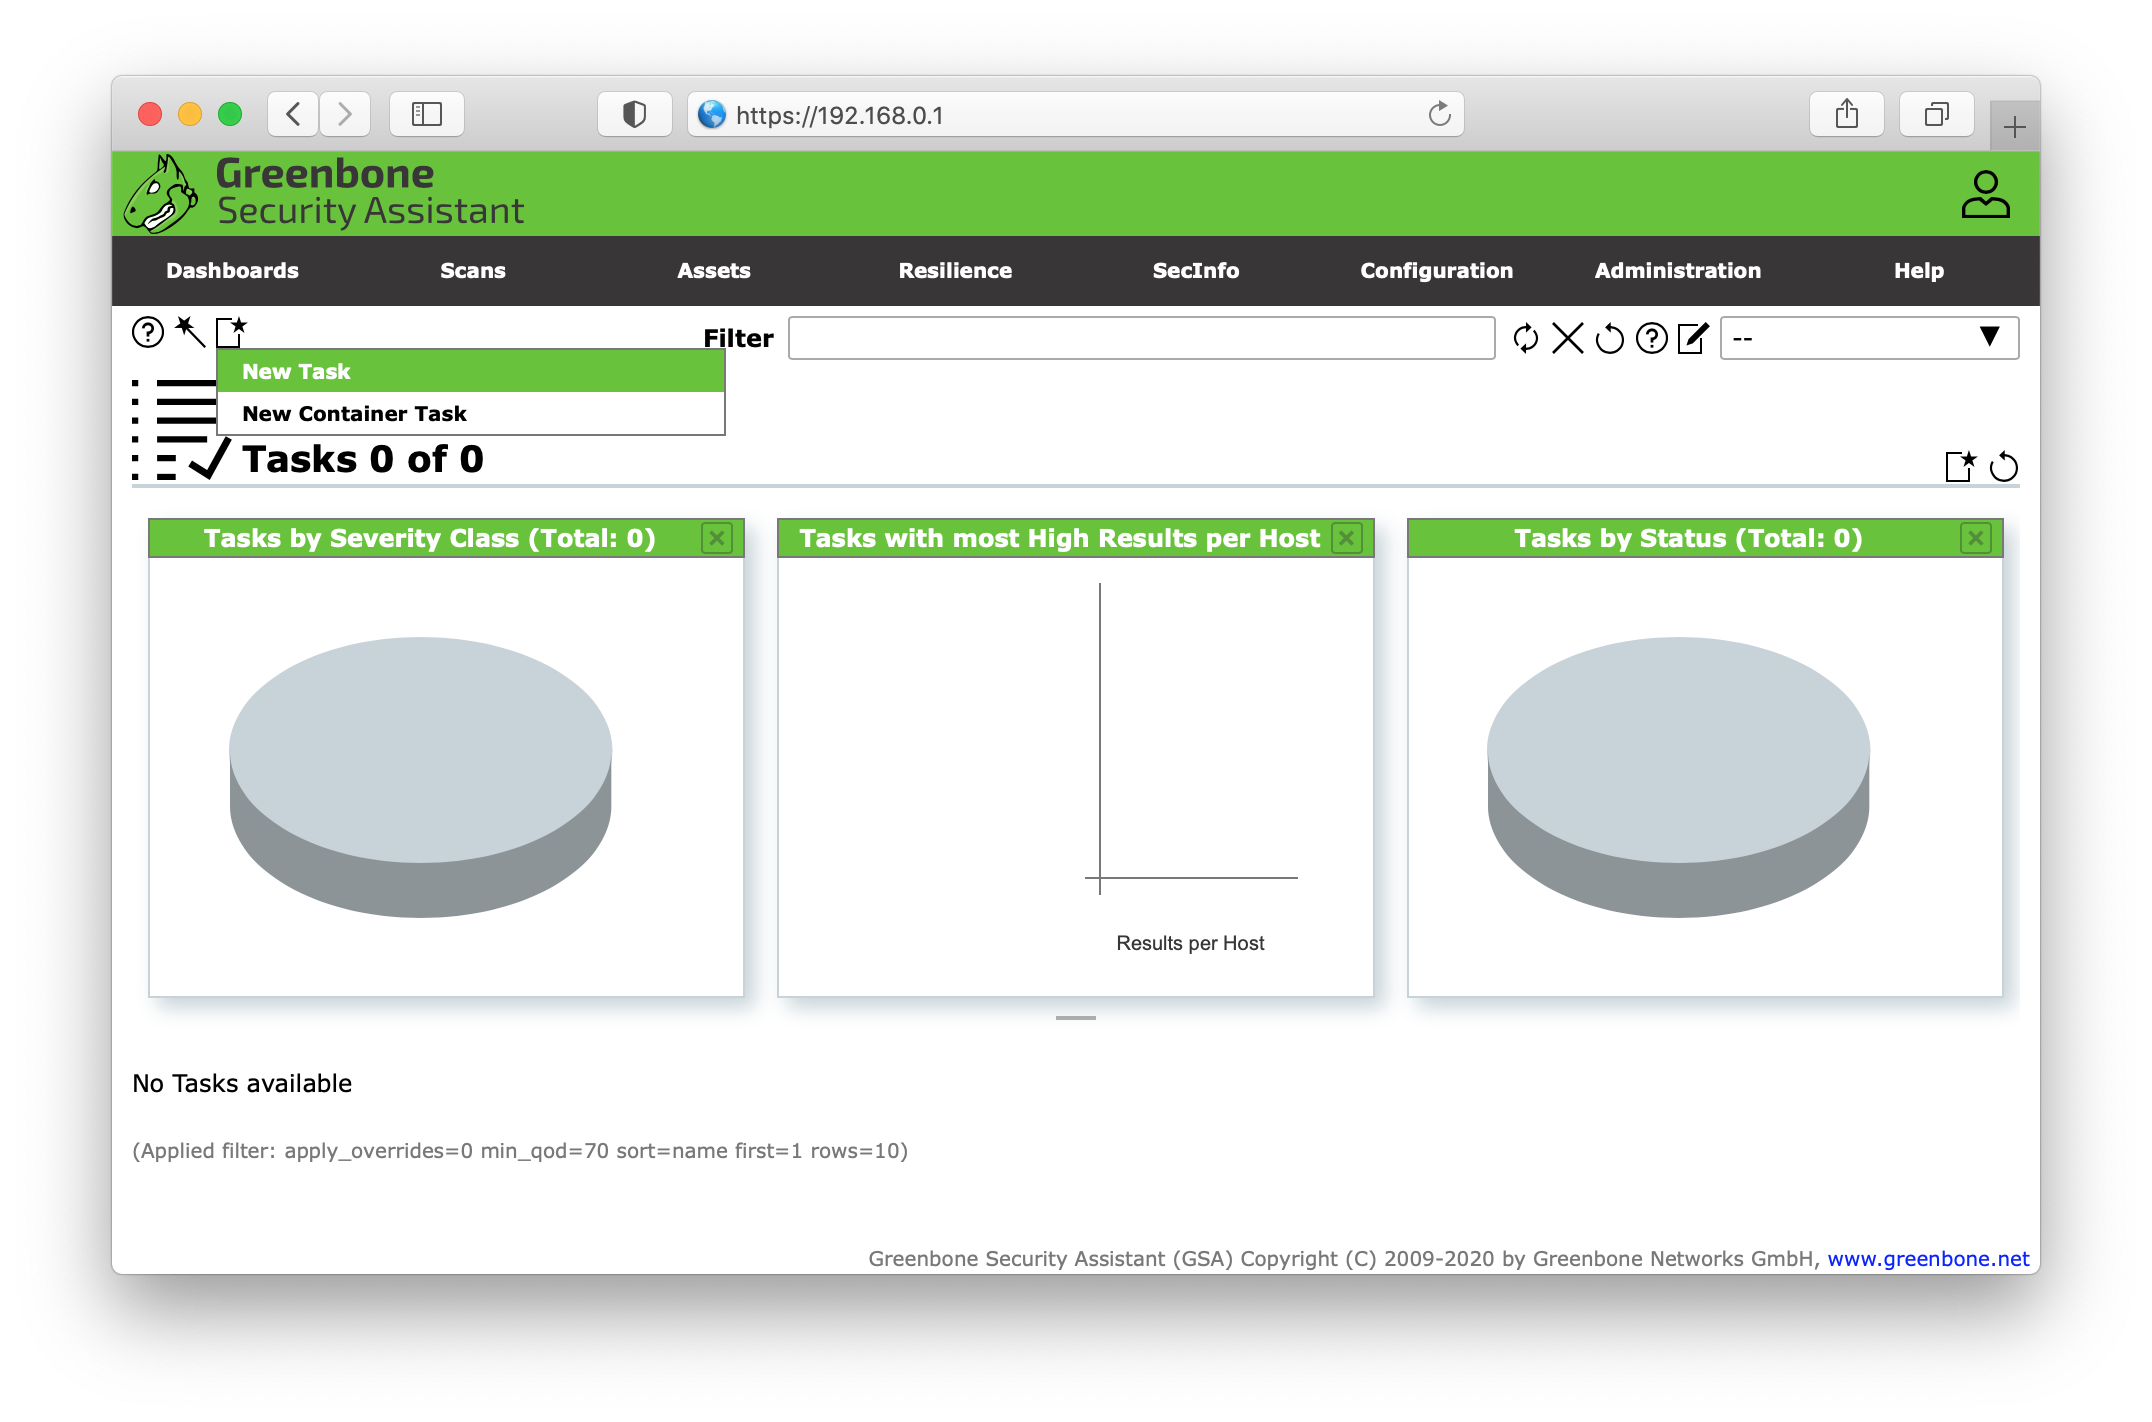
Next we will create a task for unauthenticated targets (scans without SSH access). Go the Scans in the top menu and select Tasks.
Click the starred document icon in the top left corner of the Tasks view.
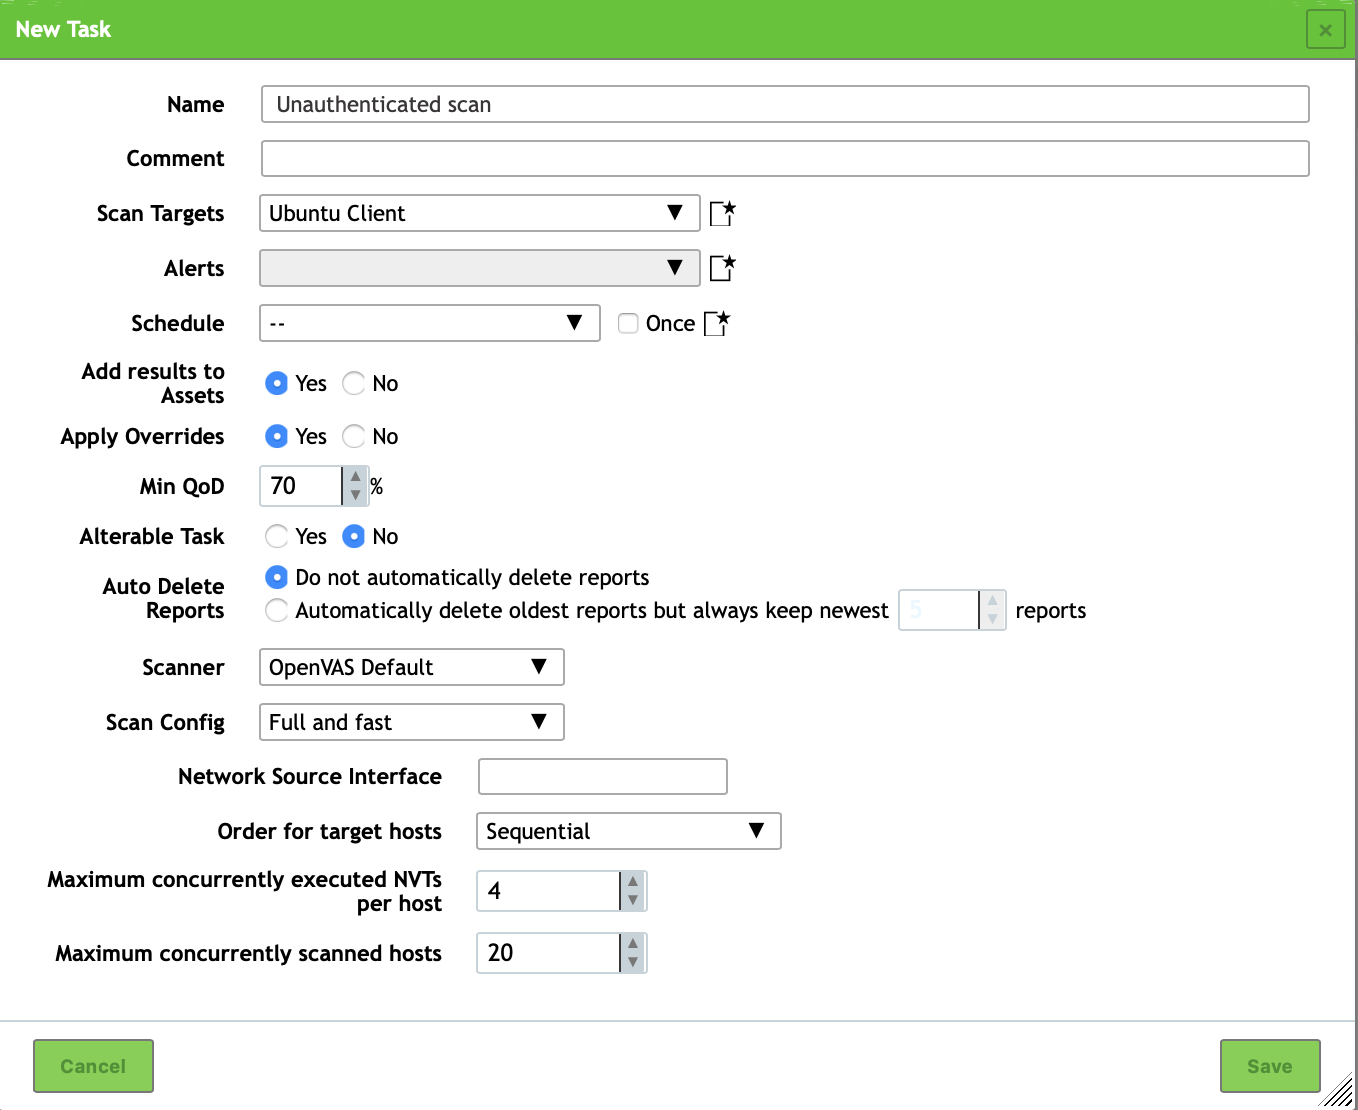
Select a descriptive name for your task e.g. Unauthenticated scan. In the Scan Targets dropdown menu select your target we created before (Ubuntu Client). Leave the default settings and click save.
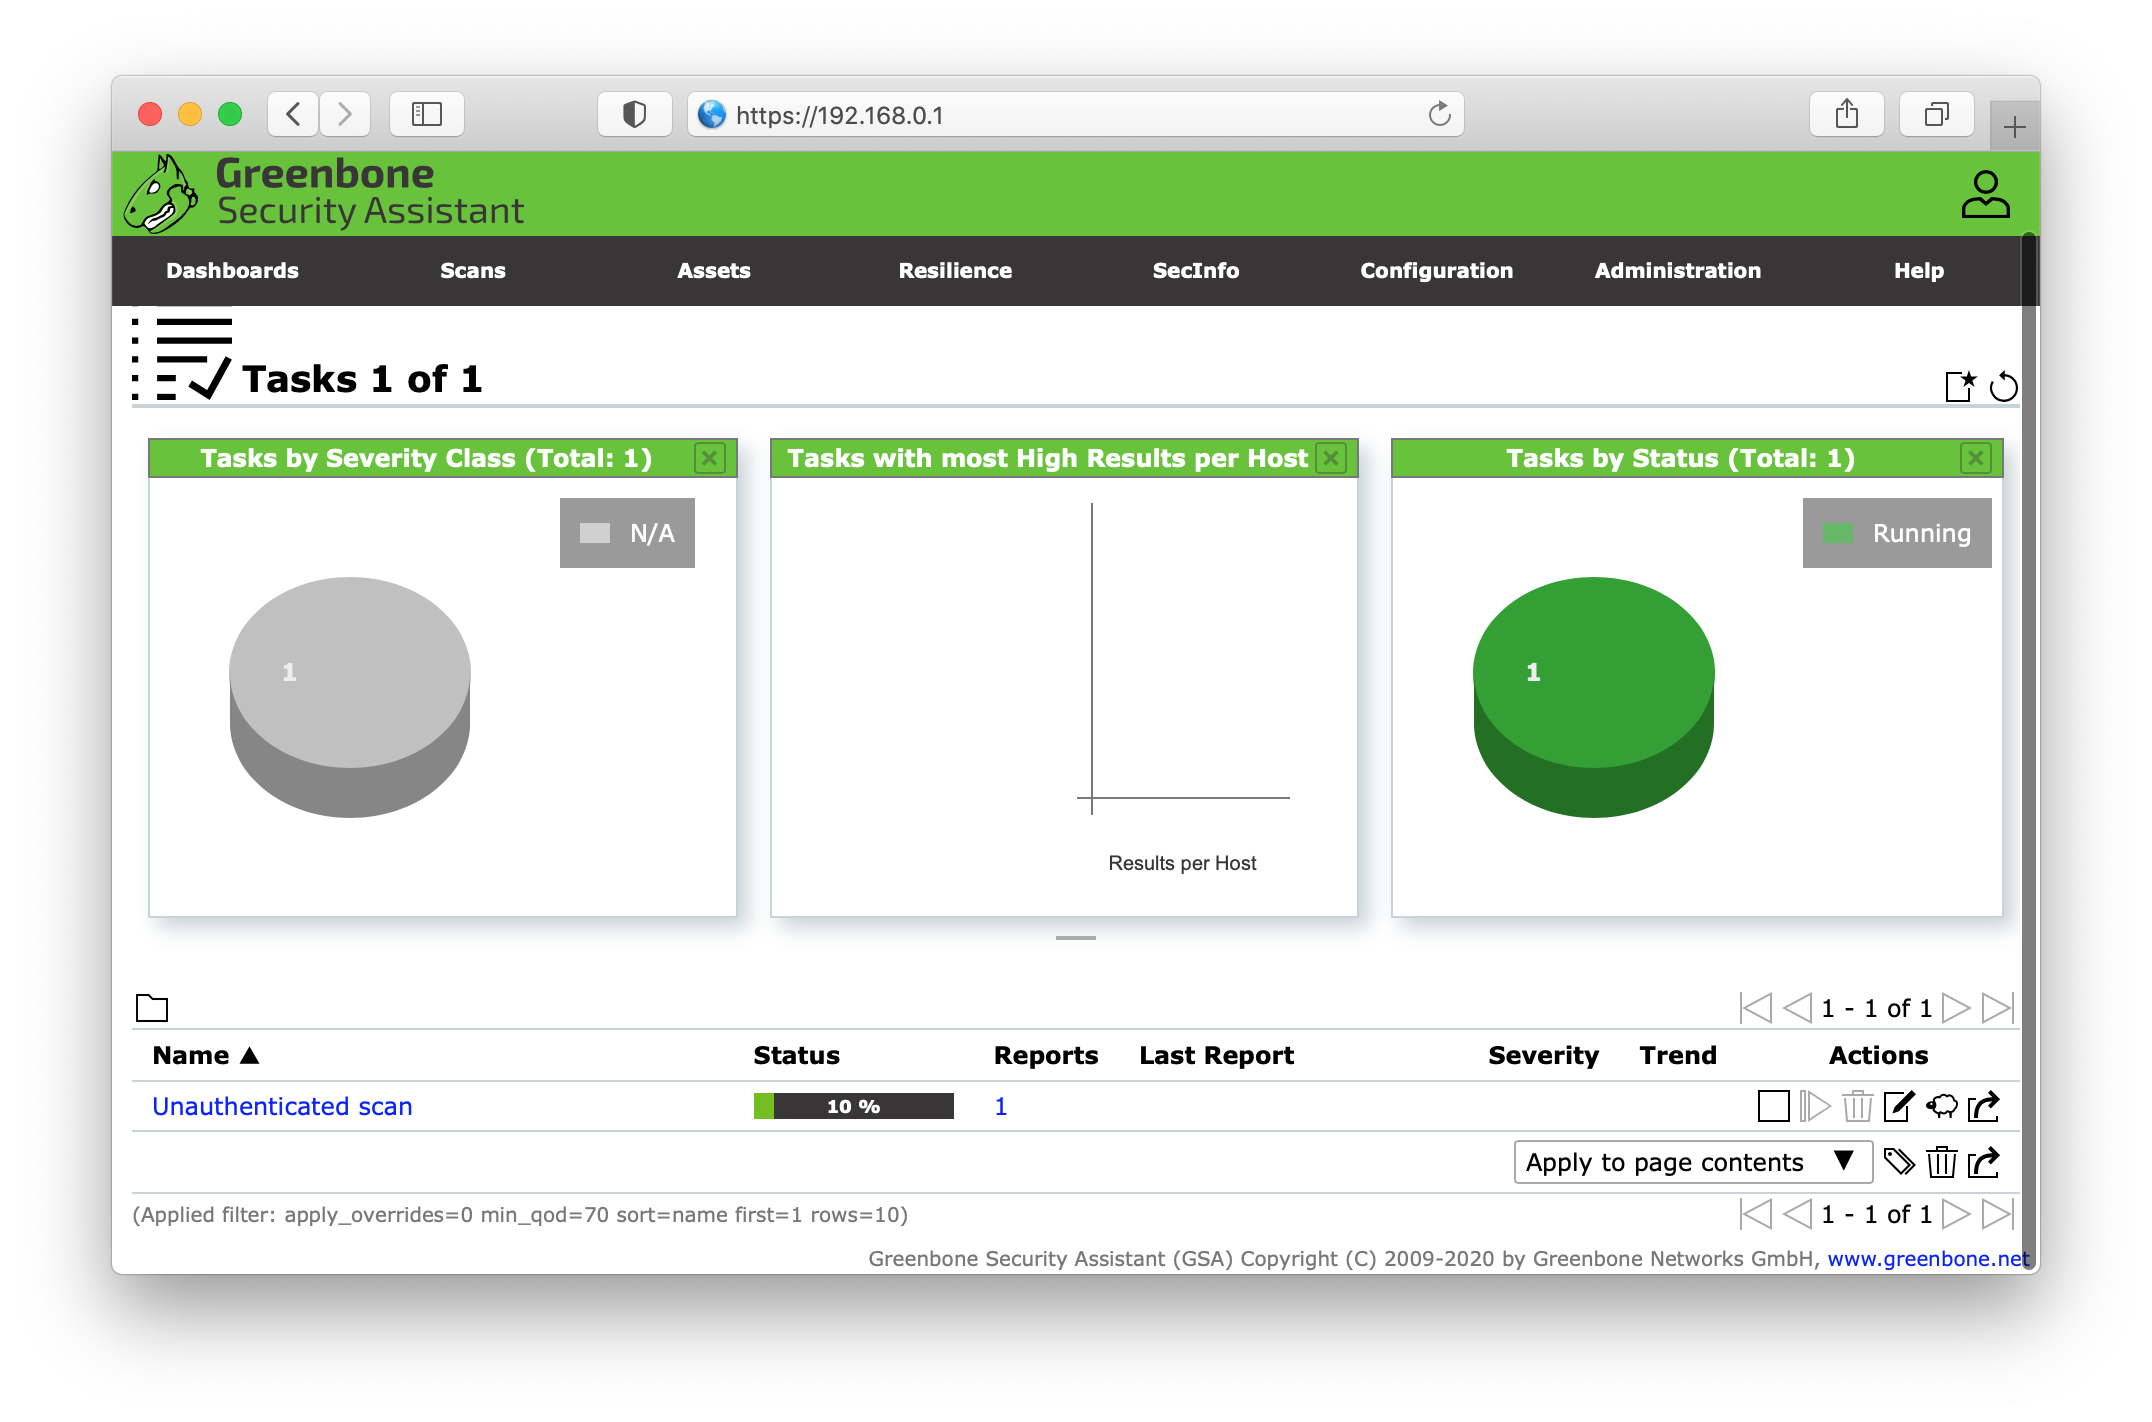
You will then be redirected back to the Tasks overview and our new task will be listed in the table below the graphs. To start the scan press the start button on the right side of the table.
Authenticated scan
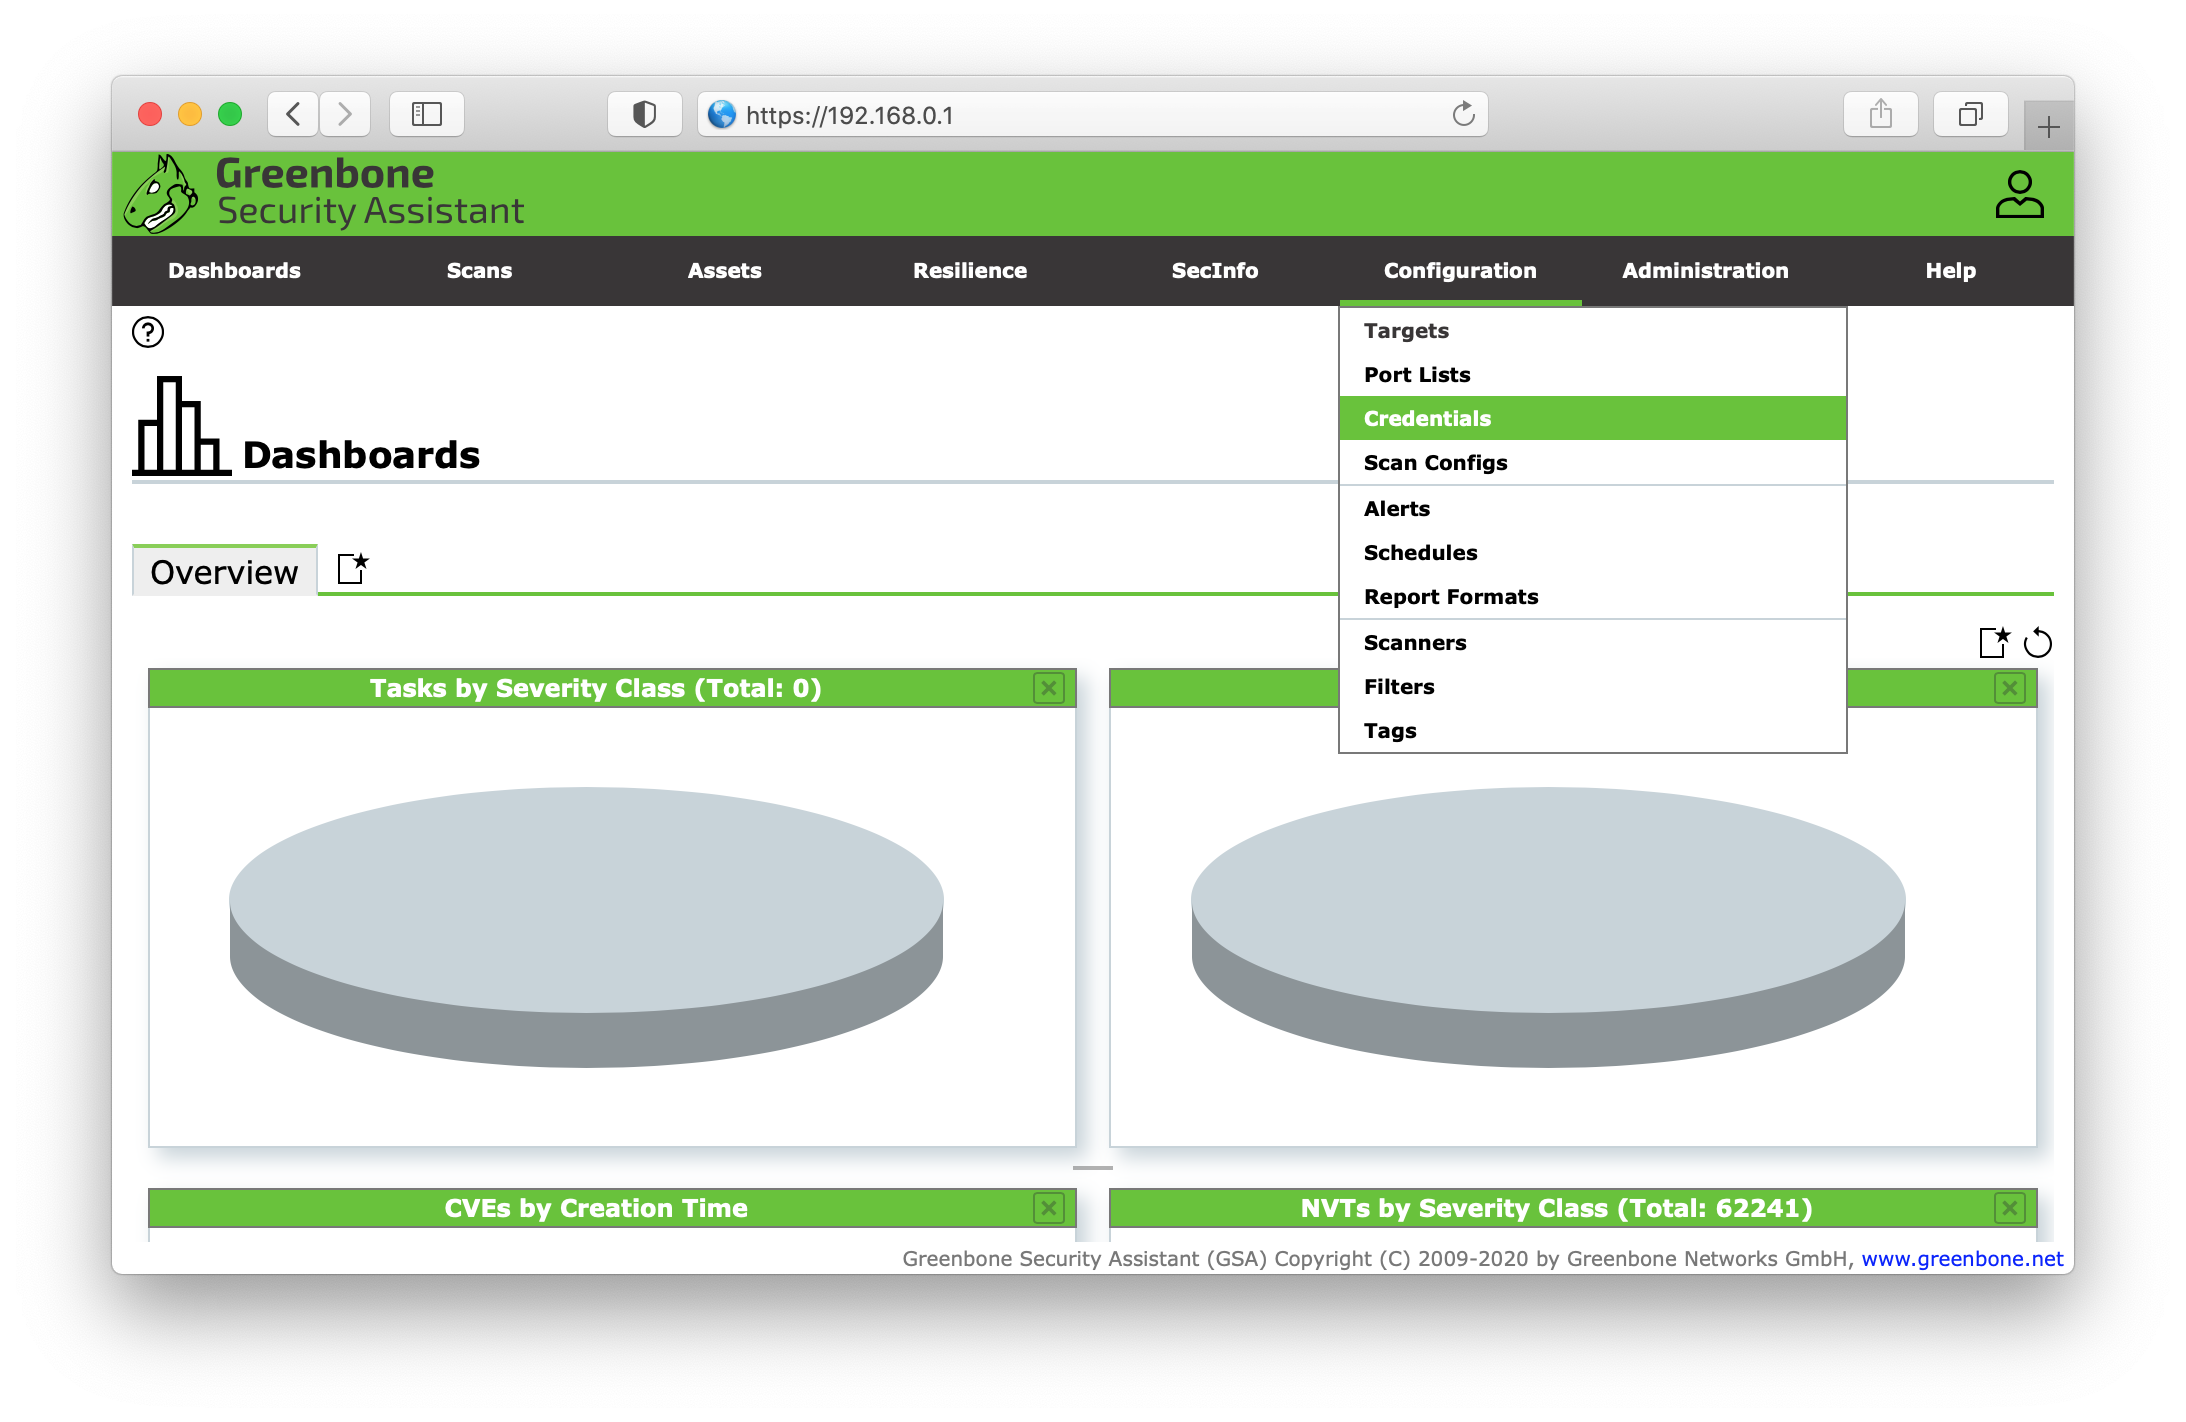
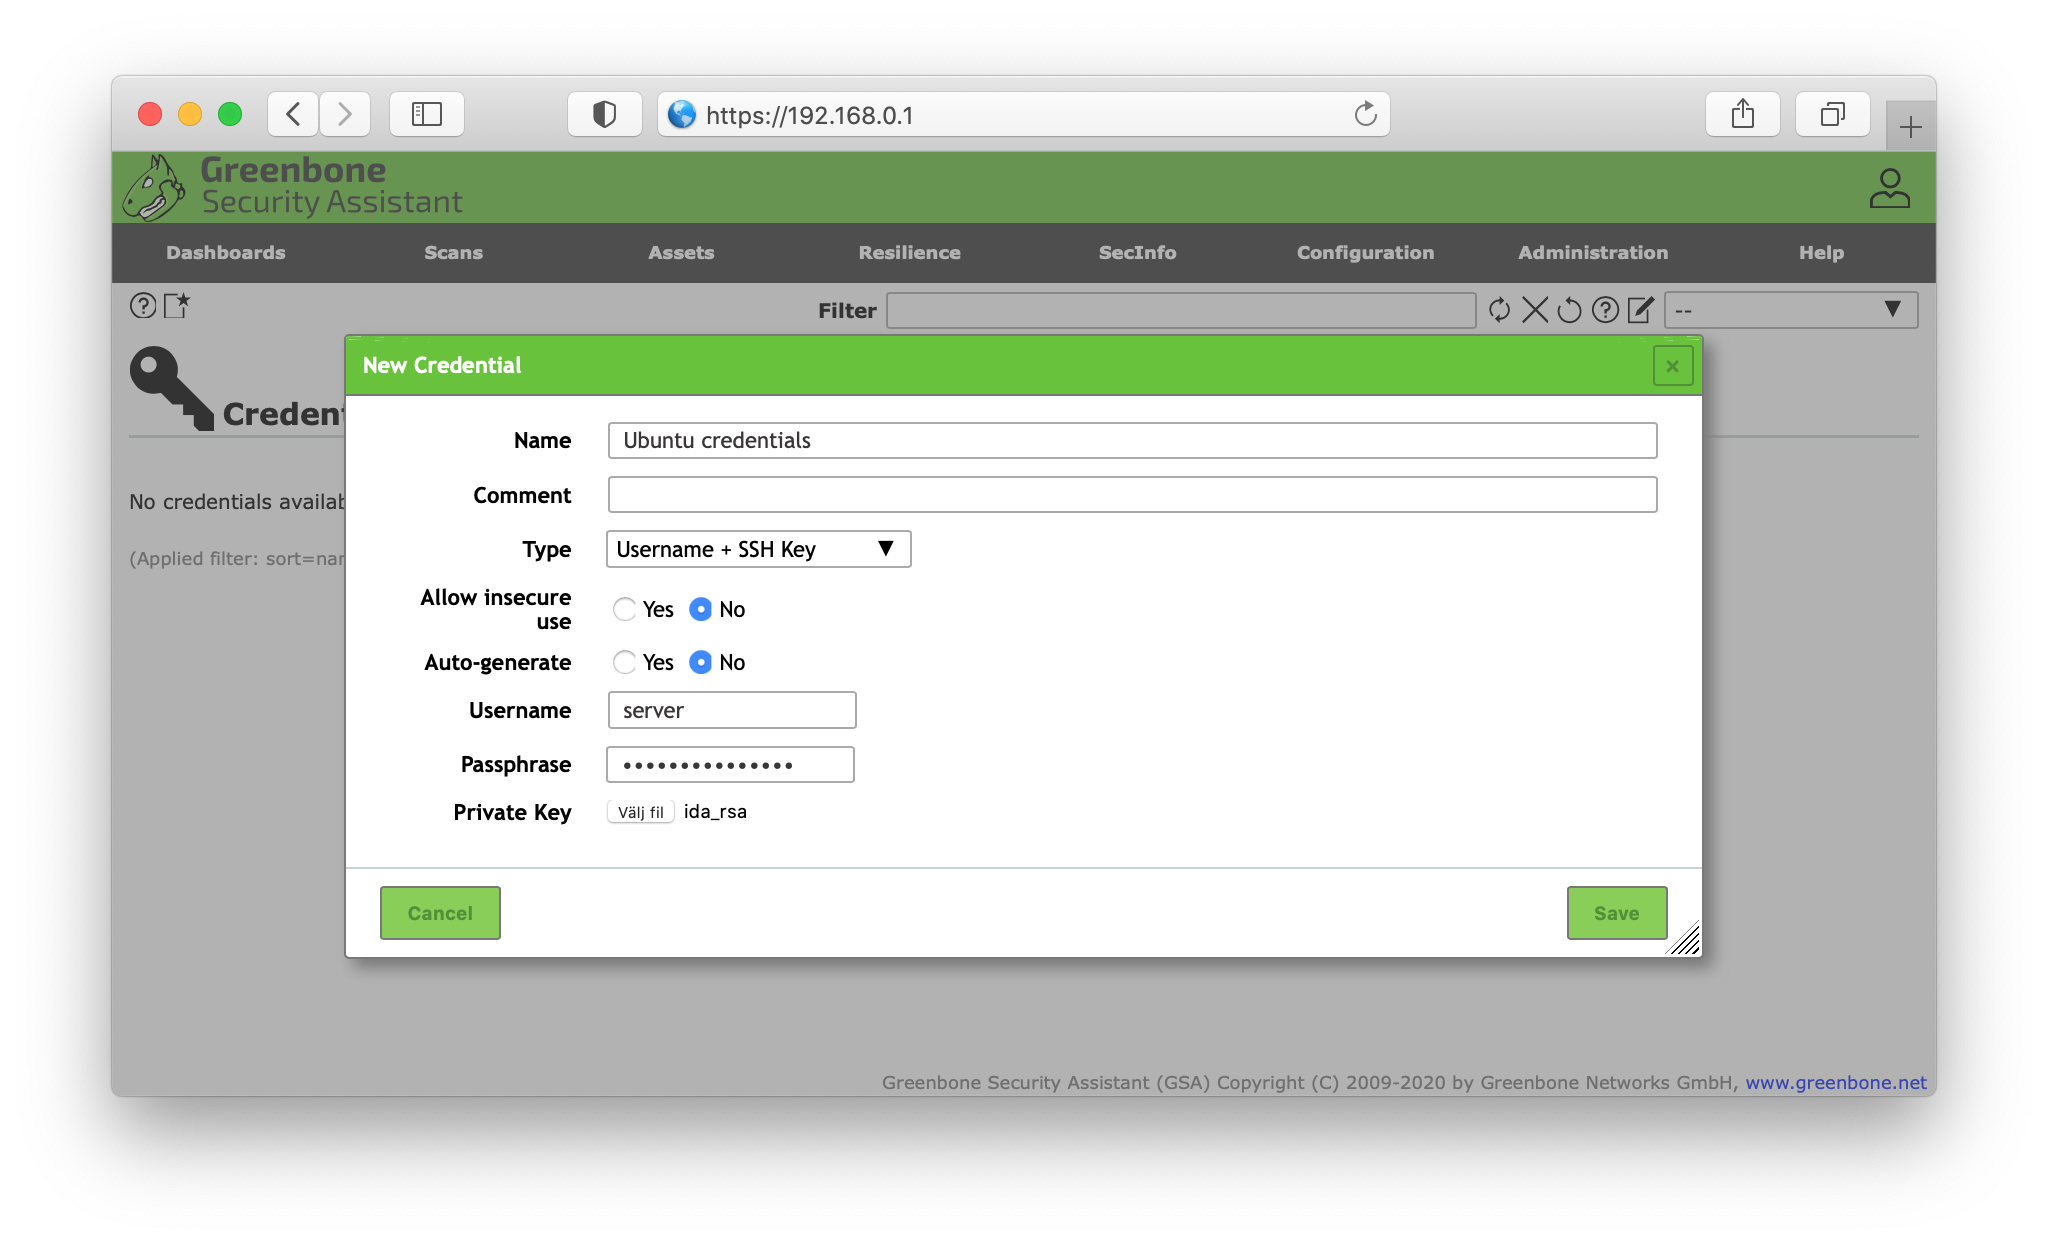
First make sure that you've generated SSH keys for your GVM client user e.g. client@ubuntu. Add your public key to the targets authorized keys file. You may have to connect to your target host, through SSH, before running GVM vulnerability scan to add the target host to your clients machine's known hosts. Once you've established a secure connection between your client and target, proceed to configure credentials in the Greenbone Security Assistant. Go to Configuration and select Credentials.
Next click the starred document in the top left corner to create your new credentials. Give the credentials a desciptive name with an optional comment. In the dropdown menu Type, select Username + SSH key and disallow insecure use and auto-generation. Add the username of the target host user followed by the password and upload the private key (e.g. id_rsa). Click save.
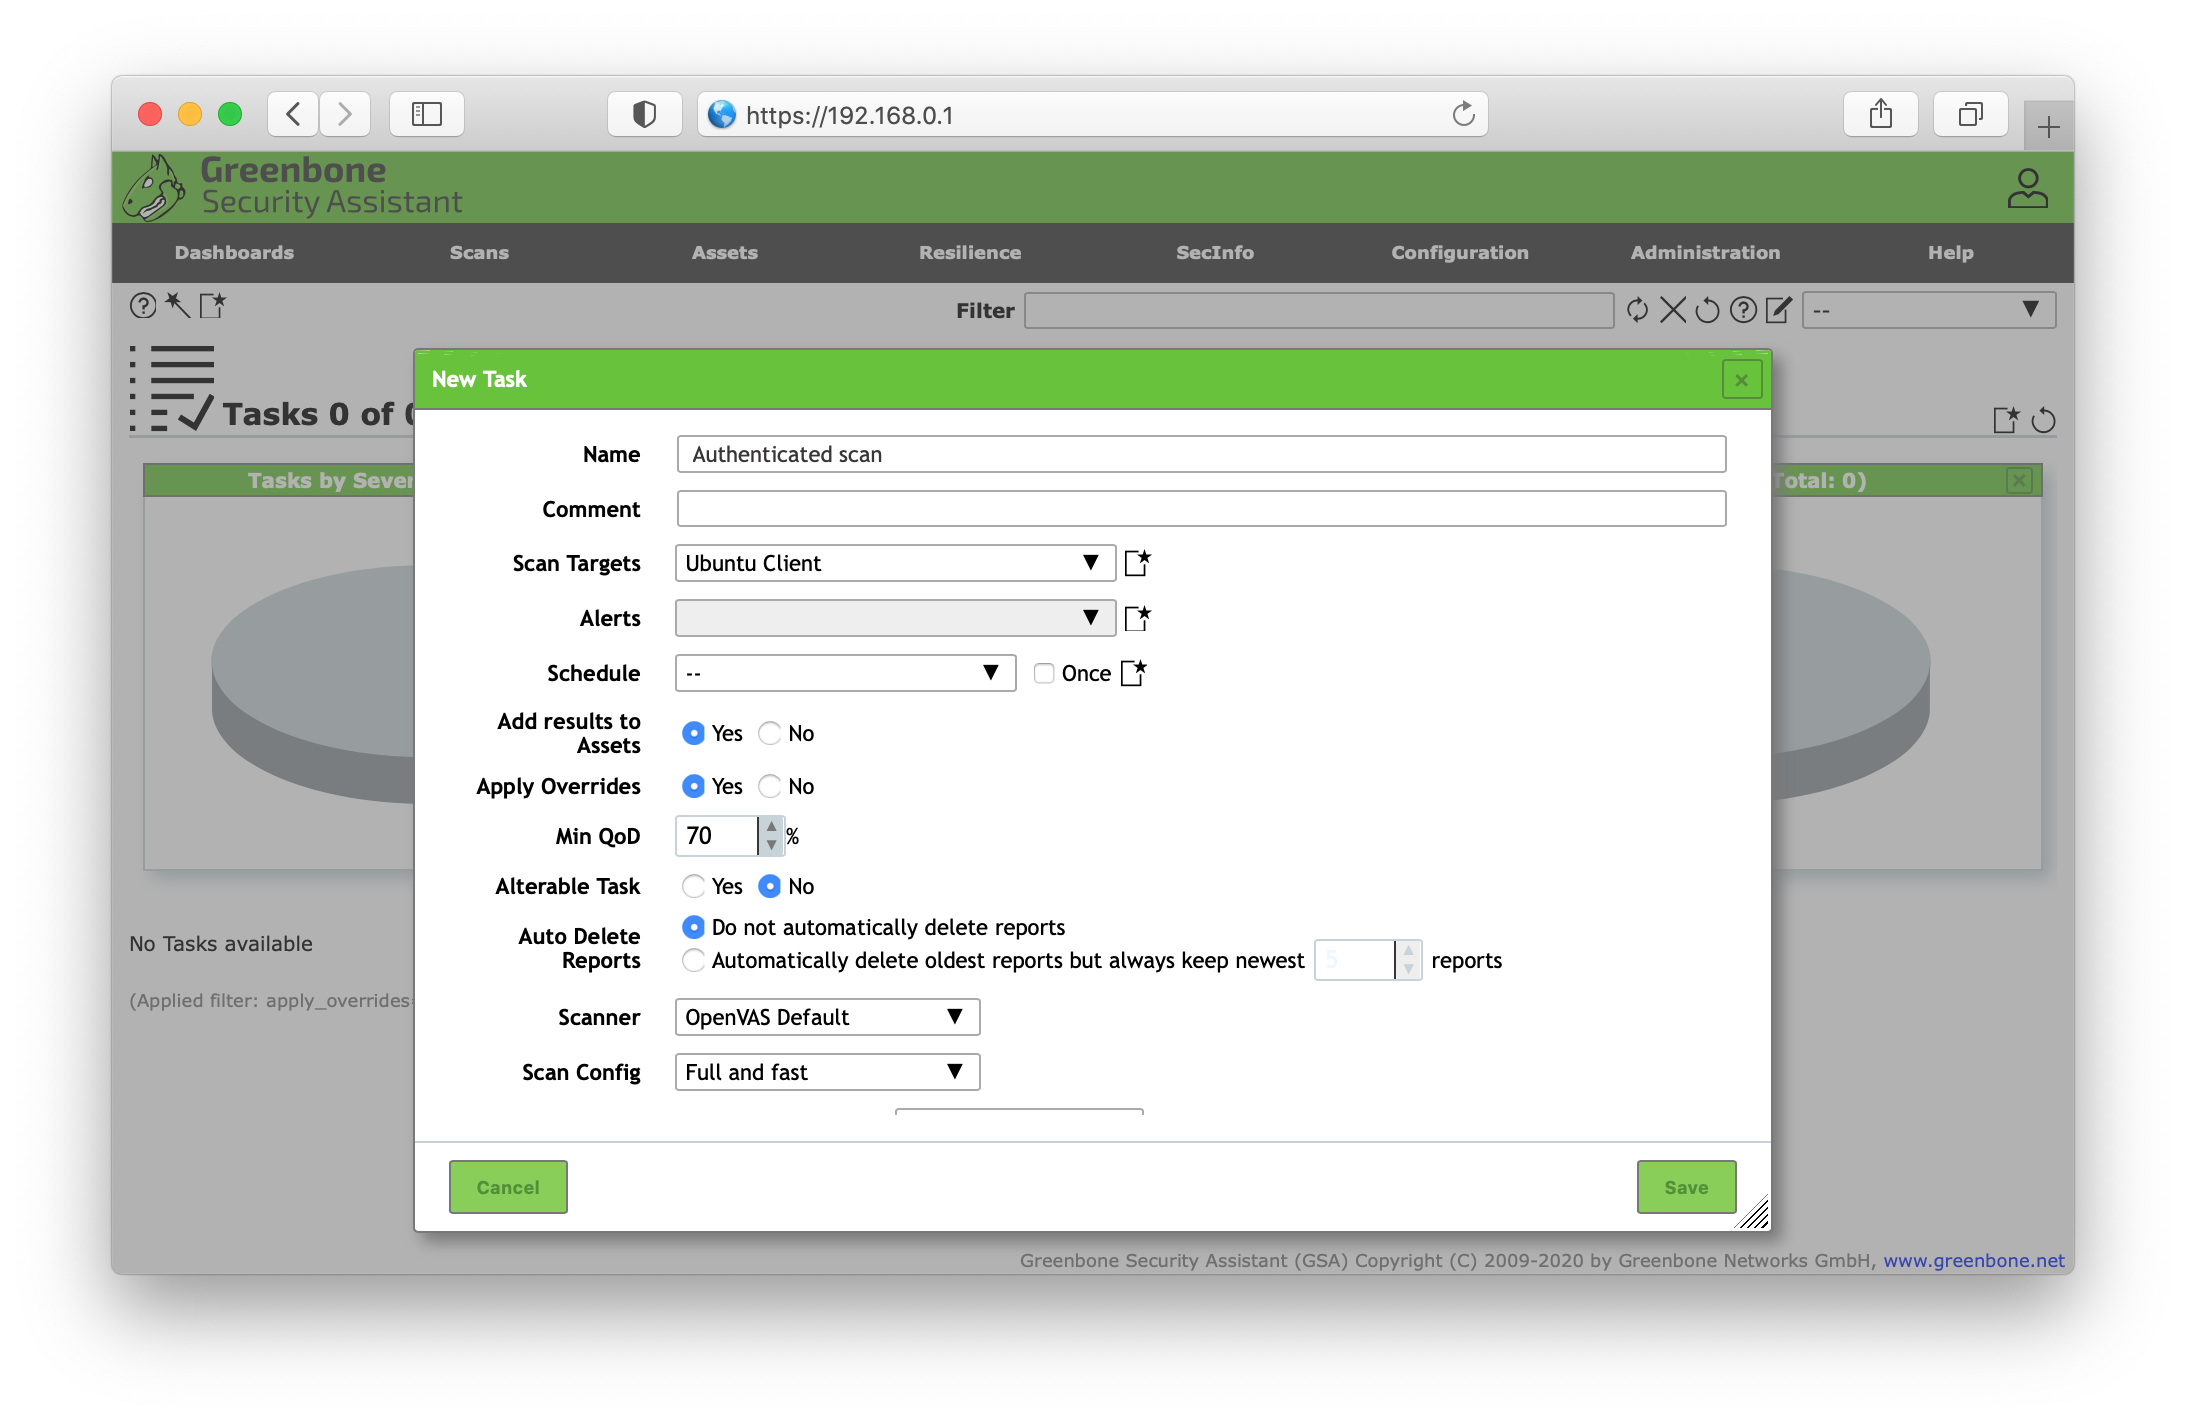
Go to the Targets section and either edit your unauthenticated scan or create a new target. Set the host IP address and in the dropdown menu, under the Credentials for authentication checks, select your newly created SSH credential.

Finally create a new task and select the target that we attached our credentials to and leave the default settings.
Two-factor authentication w/ privacyIDEA
To enforce two-factor authentication for Greenbone Security Assistant with privacyIDEA and YubiKey read the Two-factor authentication w/ privacyIDEA and YubiKey chapter.
Troubleshooting
If you encounter any issue or having questions regarding Greenbone Vulnerability Manager, I recommend using their helpful community forum.
Questions, comments, or problems regarding this service? Create an issue here or contact webmaster@libellux.com.
Enterprise solutions non-sponsored
The Greenbone Security Manager
The Greenbone Security Manager (GSM) is an appliance for vulnerability scanning and management. It is offered in various performance levels and basically supports an unlimited number of target systems. The actually achievable number depends on the scan pattern and scan targets. For finding the right model for your purpose, we provide reference values for the number of target IP addresses below, assuming a common scenario with a scan every 24 hours.