
OSSEC Host Intrusion Detection System Rev 4
OSSEC is a full platform to monitor and control your systems. It mixes all aspects of HIDS (host-based intrusion detection), log monitoring and SIM/SIEM together in a simple, powerful and open source solution.
![]()
Install OSSEC from source
To build OSSEC 3.7.0 from source, we need to first install its prerequisites.
INFO
Supported distributions:
- Ubuntu 22.04 (Jammy Jellyfish)
- Rocky Linux 9 (Blue Onyx)
Begin by updating your system.
sudo apt-get update --assume-yessudo dnf update --assumeyesProceed to install the required dependencies for OSSEC.
TIP
Optional dependencies are highlighted for clarity.
sudo apt-get install --no-install-recommends --assume-yes \
build-essential \
zlib1g-dev \
libpcre2-dev \
libevent-dev \
libssl-dev \
libsystemd-dev \
jq // [!code highlight]sudo dnf install --assumeyes \
make \
gcc \
libevent-devel \
openssl-devel \
zlib-devel \
pcre2-devel \
systemd-devel \
jq // [!code highlight]Import OSSEC signing key
Before downloading the latest version of OSSEC, retrieve and import the corresponding certificate and key file.
wget http://www.ossec.net/files/OSSEC-ARCHIVE-KEY.asc
wget https://github.com/ossec/ossec-hids/releases/download/3.7.0/ossec-hids-3.7.0.tar.gz.asc
gpg --import OSSEC-ARCHIVE-KEY.ascwget http://www.ossec.net/files/OSSEC-ARCHIVE-KEY.asc
wget https://github.com/ossec/ossec-hids/releases/download/3.7.0/ossec-hids-3.7.0.tar.gz.asc
gpg --import OSSEC-ARCHIVE-KEY.ascEdit the OSSEC signing key to establish ultimate trust.
echo "B50FB1947A0AE31145D05FADEE1B0E6B2D8387B7:6:" > /tmp/ownertrust.txt
gpg --import-ownertrust < /tmp/ownertrust.txtecho "B50FB1947A0AE31145D05FADEE1B0E6B2D8387B7:6:" > /tmp/ownertrust.txt
gpg --import-ownertrust < /tmp/ownertrust.txtNext, download the latest version of OSSEC and verify the integrity of the file.
wget https://github.com/ossec/ossec-hids/archive/3.7.0.tar.gz
gpg --verify ossec-hids-3.7.0.tar.gz.asc 3.7.0.tar.gzwget https://github.com/ossec/ossec-hids/archive/3.7.0.tar.gz
gpg --verify ossec-hids-3.7.0.tar.gz.asc 3.7.0.tar.gzThe signature output is supposed to look as follows.
gpg: Signature made Mon 17 Jan 2022 04:09:10 PM UTC
gpg: using RSA key B50FB1947A0AE31145D05FADEE1B0E6B2D8387B7
gpg: checking the trustdb
gpg: marginals needed: 3 completes needed: 1 trust model: pgp
gpg: depth: 0 valid: 1 signed: 0 trust: 0-, 0q, 0n, 0m, 0f, 1u
gpg: Good signature from "Scott R. Shinn <[email protected]>" [ultimate] // [!code focus]Build OSSEC server
Extract and run the installation script with PCRE2 support enabled.
tar -zxvf 3.7.0.tar.gz && cd ossec-hids-3.7.0/
wget https://github.com/PCRE2Project/pcre2/releases/download/pcre2-10.40/pcre2-10.40.tar.gz
tar -zxvf pcre2-10.40.tar.gz -C src/external/
sudo PCRE2_SYSTEM=yes ./install.shtar -zxvf 3.7.0.tar.gz && cd ossec-hids-3.7.0/
wget https://github.com/PCRE2Project/pcre2/releases/download/pcre2-10.40/pcre2-10.40.tar.gz
tar -zxvf pcre2-10.40.tar.gz -C src/external/
sudo PCRE2_SYSTEM=yes ./install.shSelect your preferred language and choose server installation. Adjust the options to suit your requirements.
TIP
Suggested (y/n) options are selected.
(en/br/cn/de/el/es/fr/hu/it/jp/nl/pl/ru/sr/tr) [en]:
What kind of installation do you want (server, agent, local, hybrid or help)? server
Choose where to install the OSSEC HIDS [/var/ossec/]:
Do you want e-mail notification? (y/n) [y]: n
Do you want to run the integrity check daemon? (y/n) [y]: y
Do you want to run the rootkit detection engine? (y/n) [y]: y
Do you want to enable active response? (y/n) [y]: y
Do you want to enable the firewall-drop response? (y/n) [y]: y
Do you want to add more IPs to the white list? (y/n)? [n]: n
Do you want to enable remote syslog (port 514 udp)? (y/n) [y]: y
--- Press ENTER to finish (maybe more information below). ---Click to view full installation process
OSSEC HIDS v3.7.0 Installation Script - http://www.ossec.net
You are about to start the installation process of the OSSEC HIDS.
You must have a C compiler pre-installed in your system.
- System: Linux libellux 5.4.0-84-generic
- User: root
- Host: libellux
-- Press ENTER to continue or Ctrl-C to abort. --
1- What kind of installation do you want (server, agent, local, hybrid or help)? server
- Server installation chosen.
2- Setting up the installation environment.
- Choose where to install the OSSEC HIDS [/var/ossec/]:
- Installation will be made at /var/ossec .
3- Configure the OSSEC HIDS.
3.1- Do you want e-mail notification? (y/n) [y]: n
--- Email notification disabled.
3.2- Do you want to run the integrity check daemon? (y/n) [y]: y
- Running syscheck (integrity check daemon).
3.3- Do you want to run the rootkit detection engine? (y/n) [y]: y
- Running rootcheck (rootkit detection).
3.4- Active response allows you to execute a specific
command based on the events received. For example,
you can block an IP address or disable access for
a specific user.
More information at:
http://www.ossec.net/en/manual.html#active-response
- Do you want to enable active response? (y/n) [y]: y
- Active response enabled.
- By default, we can enable the host-deny and the
firewall-drop responses. The first one will add
a host to the /etc/hosts.deny and the second one
will block the host on iptables (if linux) or on
ipfilter (if Solaris, FreeBSD or NetBSD).
- They can be used to stop SSHD brute force scans,
portscans and some other forms of attacks. You can
also add them to block on snort events, for example.
- Do you want to enable the firewall-drop response? (y/n) [y]: y
- firewall-drop enabled (local) for levels >= 6
-
- 127.0.0.53
- Do you want to add more IPs to the white list? (y/n)? [n]: n
3.5- Do you want to enable remote syslog (port 514 udp)? (y/n) [y]: y
- Remote syslog enabled.
3.6- Setting the configuration to analyze the following logs:
-- /var/log/auth.log
-- /var/log/syslog
-- /var/log/dpkg.log
- If you want to monitor any other file, just change
the ossec.conf and add a new localfile entry.
Any questions about the configuration can be answered
by visiting us online at http://www.ossec.net .
--- Press ENTER to finish ---Server configuration
Allow list
In the global section of the OSSEC configuration file, include the IP addresses of the clients and services, such as Greenbone Vulnerability Manager, that we do not want to be blocked by active response.
sudo nano /var/ossec/etc/ossec.confsudo nano /var/ossec/etc/ossec.conf<global>
<allow_list>127.0.0.1</allow_list>
<allow_list>::1</allow_list>
<allow_list>localhost.localdomain</allow_list>
<allow_list>127.0.0.53</allow_list>
<allow_list>192.168.0.2</allow_list> <!-- OSSEC client -->
<allow_list>192.168.0.3</allow_list> <!-- Greenbone Vulnerability Manager -->
</global>Remote syslog
To enable the function of harvesting syslogs from our OSSEC agents, we'll need to ensure the security of our remote client connection and allow it. Add the client's IP address within the remote section.
sudo nano /var/ossec/etc/ossec.confsudo nano /var/ossec/etc/ossec.conf<remote>
<connection>secure</connection>
<allowed-ips>192.168.0.2</allowed-ips> <!-- OSSEC client -->
</remote>Active response
To enable active response on both agents and server regardless of where the event is created, set the location to "all".
sudo nano /var/ossec/etc/ossec.confsudo nano /var/ossec/etc/ossec.confTIP
- local: on the agent that generated the event
- server: on the OSSEC server
- defined-agent: on a specific agent (when using this option, you need to set the agent_id to use)
- all: or everywhere.
<!-- Active Response Config -->
<active-response>
<!-- This response is going to execute the host-deny
- command for every event that fires a rule with
- level (severity) >= 6.
- The IP is going to be blocked for 600 seconds.
-->
<command>host-deny</command>
<location>all</location> // [!code focus]
<level>6</level>
<timeout>600</timeout>
</active-response>
<active-response>
<!-- Firewall Drop response. Block the IP for
- 600 seconds on the firewall (iptables,
- ipfilter, etc).
-->
<command>firewall-drop</command>
<location>all</location> // [!code focus]
<level>6</level>
<timeout>600</timeout>
</active-response>Repeat offenders
The first time an IP is blocked, it will be put on timeout for the default 600 seconds. If the IP is blocked again, it will be added to the defined repeating offenders list. To enable repeat offenders, add the entry in the active response config.
sudo nano /var/ossec/etc/ossec.confsudo nano /var/ossec/etc/ossec.confINFO
Enable repeat offenders for both the "host-deny" and "firewall-drop" command.
<!-- Active Response Config -->
<active-response>
<!-- This response is going to execute the host-deny
- command for every event that fires a rule with
- level (severity) >= 6.
- The IP is going to be blocked for 600 seconds.
-->
<command>host-deny</command>
<location>all</location>
<level>6</level>
<timeout>600</timeout>
<repeated_offenders>30,60,120,240,480</repeated_offenders> // [!code focus]
</active-response>
<active-response>
<!-- Firewall Drop response. Block the IP for
- 600 seconds on the firewall (iptables,
- ipfilter, etc).
-->
<command>firewall-drop</command>
<location>all</location>
<level>6</level>
<timeout>600</timeout>
<repeated_offenders>30,60,120,240,480</repeated_offenders> // [!code focus]
</active-response>Save the config and start OSSEC to confirm that the repeated offenders been added.
sudo /var/ossec/bin/ossec-control startsudo /var/ossec/bin/ossec-control startStarting OSSEC HIDS v3.7.0...
2024/03/01 09:06:05 ossec-execd: INFO: Adding offenders timeout: 30 (for #1) // [!code highlight]
2024/03/01 09:06:05 ossec-execd: INFO: Adding offenders timeout: 60 (for #2) // [!code highlight]
2024/03/01 09:06:05 ossec-execd: INFO: Adding offenders timeout: 120 (for #3) // [!code highlight]
2024/03/01 09:06:05 ossec-execd: INFO: Adding offenders timeout: 240 (for #4) // [!code highlight]
2024/03/01 09:06:05 ossec-execd: INFO: Adding offenders timeout: 480 (for #5) // [!code highlight]
Started ossec-execd...
Started ossec-analysisd...
Started ossec-logcollector...
Started ossec-remoted...
Started ossec-syscheckd...
Started ossec-monitord...
Completed.JSON output
In addition to standard alert logging, we will enable JSON output for Fluent Bit to forward alerts to OpenSearch.
TIP
Learn how to forward OSSEC alerts to OpenSearch.
<ossec_config>
<global>
<jsonout_output>yes</jsonout_output> // [!code focus]
<email_notification>no</email_notification>
</global>Snort log format
Depending on the Snort output format, define either "snort-fast" or "snort-full". If Snort is running on a stand-alone server, define the log format on the OSSEC agent.
TIP
Learn how to select Snort output format.
<localfile>
<log_format>snort-fast</log_format> // [!code focus]
<location>/var/log/snort/alert</location>
</localfile>Additional rulesets
If PSAD Intrusion Detection is to be used, ensure to include the PSAD ruleset in the configuration file as it's not defined by default.
INFO
Please make sure that whenever you add another ruleset, such as psad_rules.xml, it is included ahead of the local_rules.xml.
<include>openbsd-dhcpd_rules.xml</include>
<include>dnsmasq_rules.xml</include>
<include>nsd_rules.xml</include>
<include>unbound_rules.xml</include>
<include>psad_rules.xml</include> <!-- PSAD rules -->
<include>local_rules.xml</include>
</rules>Agent installation
To install OSSEC 3.7.0 as an agent on either Ubuntu 22.04 or Rocky Linux 9, begin by updating your system and then download its prerequisites.
sudo apt-get update --assume-yessudo dnf update -assumeyesProceed to install the required dependencies for OSSEC.
sudo apt-get install --no-install-recommends --assume-yes \
build-essential \
zlib1g-dev \
libpcre2-dev \
libevent-dev \
libssl-devsudo dnf install -assumeyes \
make \
gcc \
libevent-devel \
openssl-devel \
zlib-devel \
pcre2-devel \
systemd-develImport signing key
Before downloading the latest version of OSSEC, retrieve and import the corresponding certificate and key file.
wget http://www.ossec.net/files/OSSEC-ARCHIVE-KEY.asc
wget https://github.com/ossec/ossec-hids/releases/download/3.7.0/ossec-hids-3.7.0.tar.gz.asc
gpg --import OSSEC-ARCHIVE-KEY.ascwget http://www.ossec.net/files/OSSEC-ARCHIVE-KEY.asc
wget https://github.com/ossec/ossec-hids/releases/download/3.7.0/ossec-hids-3.7.0.tar.gz.asc
gpg --import OSSEC-ARCHIVE-KEY.ascEdit the OSSEC signing key to establish ultimate trust.
echo "B50FB1947A0AE31145D05FADEE1B0E6B2D8387B7:6:" > /tmp/ownertrust.txt
gpg --import-ownertrust < /tmp/ownertrust.txtecho "B50FB1947A0AE31145D05FADEE1B0E6B2D8387B7:6:" > /tmp/ownertrust.txt
gpg --import-ownertrust < /tmp/ownertrust.txtNext, download the latest version of OSSEC and verify the integrity of the file.
wget https://github.com/ossec/ossec-hids/archive/3.7.0.tar.gz
gpg --verify ossec-hids-3.7.0.tar.gz.asc 3.7.0.tar.gzwget https://github.com/ossec/ossec-hids/archive/3.7.0.tar.gz
gpg --verify ossec-hids-3.7.0.tar.gz.asc 3.7.0.tar.gzThe signature output is supposed to look as follows.
gpg: Signature made Mon 17 Jan 2022 04:09:10 PM UTC
gpg:                using RSA key B50FB1947A0AE31145D05FADEE1B0E6B2D8387B7
gpg: checking the trustdb
gpg: marginals needed: 3  completes needed: 1  trust model: pgp
gpg: depth: 0  valid:   1  signed:   0  trust: 0-, 0q, 0n, 0m, 0f, 1u
gpg: Good signature from "Scott R. Shinn <[email protected]>" [ultimate] // [!code focus]
Build OSSEC agent
Extract and run the installation script with PCRE2 support enabled.
tar -zxvf 3.7.0.tar.gz && cd ossec-hids-3.7.0/
wget https://github.com/PCRE2Project/pcre2/releases/download/pcre2-10.40/pcre2-10.40.tar.gz
tar -zxvf pcre2-10.40.tar.gz -C src/external/
sudo PCRE2_SYSTEM=yes ./install.shtar -zxvf 3.7.0.tar.gz && cd ossec-hids-3.7.0/
wget https://github.com/PCRE2Project/pcre2/releases/download/pcre2-10.40/pcre2-10.40.tar.gz
tar -zxvf pcre2-10.40.tar.gz -C src/external/
sudo PCRE2_SYSTEM=yes ./install.shSelect your preferred language and choose agent installation. Adjust the options to suit your requirements.
TIP
Make sure to define your OSSEC server's IP address, which is highlighted in the output below.
(en/br/cn/de/el/es/fr/hu/it/jp/nl/pl/ru/sr/tr) [en]:
What kind of installation do you want (server, agent, local, hybrid or help)? agent // [!code highlight]
Choose where to install the OSSEC HIDS [/var/ossec/]:
What's the IP Address or hostname of the OSSEC HIDS server?: 192.168.0.1 // [!code highlight]
Do you want to run the integrity check daemon? (y/n) [y]: y
Do you want to run the rootkit detection engine? (y/n) [y]: y
Do you want to enable active response? (y/n) [y]: y
--- Press ENTER to finish (maybe more information below). ---
Click to view full installation process
 OSSEC HIDS v3.7.0 Installation Script - http://www.ossec.net

 You are about to start the installation process of the OSSEC HIDS.
 You must have a C compiler pre-installed in your system.

  - System: Linux libellux 5.4.0-84-generic
  - User: root
  - Host: libellux


  -- Press ENTER to continue or Ctrl-C to abort. --


1- What kind of installation do you want (server, agent, local, hybrid or help)? agent

  - Agent(client) installation chosen.

2- Setting up the installation environment.

 - Choose where to install the OSSEC HIDS [/var/ossec]:

    - Installation will be made at  /var/ossec .

3- Configuring the OSSEC HIDS.

  3.1- What's the IP Address or hostname of the OSSEC HIDS server?: 192.168.0.1

   - Adding Server IP 192.168.0.1

  3.2- Do you want to run the integrity check daemon? (y/n) [y]: y

   - Running syscheck (integrity check daemon).

  3.3- Do you want to run the rootkit detection engine? (y/n) [y]: y

   - Running rootcheck (rootkit detection).

  3.4 - Do you want to enable active response? (y/n) [y]: y


  3.5- Setting the configuration to analyze the following logs:
    -- /var/log/auth.log
    -- /var/log/syslog
    -- /var/log/dpkg.log

 - If you want to monitor any other file, just change
   the ossec.conf and add a new localfile entry.
   Any questions about the configuration can be answered
   by visiting us online at http://www.ossec.net .


   --- Press ENTER to continue ---
Agent configuration
Edit the agent configuration file and verify that the server IP address is correct. We will disable email notifications since we utilize other channels for alerts.
sudo nano /var/ossec/etc/ossec.confsudo nano /var/ossec/etc/ossec.conf<ossec_config>
<client>
<server-ip>192.168.0.1</server-ip> <!-- OSSEC server -->
<config-profile></config-profile>
</client>
<global>
<email_notification>no</email_notification> // [!code focus]
</global>Manage agents
To add an agent to your OSSEC server, execute the command displayed in the code segments below and proceed with the provided instructions.
sudo /var/ossec/bin/manage_agentssudo /var/ossec/bin/manage_agents****************************************
* OSSEC HIDS v3.7.0 Agent manager. *
* The following options are available: *
****************************************
(A)dd an agent (A). // [!code highlight]
(E)xtract key for an agent (E).
(L)ist already added agents (L).
(R)emove an agent (R).
(Q)uit.
Choose your action: A,E,L,R or Q: A
- Adding a new agent (use '\q' to return to the main menu).
Please provide the following:
* A name for the new agent: client
* The IP Address of the new agent: 192.168.0.2
* An ID for the new agent[001]: 001
Agent information:
ID:001
Name:client
IP Address:192.168.0.2
Confirm adding it?(y/n): yOnce you've added the client proceed by extracting its agent key by providing the assigned agent ID.
****************************************
* OSSEC HIDS v3.7.0 Agent manager.     *
* The following options are available: *
****************************************
   (A)dd an agent (A).
   (E)xtract key for an agent (E). // [!code highlight]
   (L)ist already added agents (L).
   (R)emove an agent (R).
   (Q)uit.
Choose your action: A,E,L,R or Q: E

Available agents:
   ID: 001, Name: client, IP: 192.168.0.2
Provide the ID of the agent to extract the key (or '\q' to quit): 001 // [!code highlight]

Agent key information for '001' is:
523b0d579891be85956bb3da6c757455005eaf1508ef578186431efbebf5901ecb467ddd857ed5dfdeb5b2cb00e8911c6d031= // [!code highlight]

** Press ENTER to return to the main menu.
Copy the agent key and head back to your OSSEC client and import the agent key. Execute the command - shown in the code section below – on the client and paste the key. Validate that your agent information is correct before adding it.
::: code-group-item Ubuntu
client@ubuntu:~$ sudo /var/ossec/bin/manage_agents::: ::: code-group-item Rocky
client@rocky:~$ sudo /var/ossec/bin/manage_agents:::
****************************************
* OSSEC HIDS v3.6.0 Agent manager.     *
* The following options are available: *
****************************************
   (I)mport key from the server (I).
   (Q)uit.
Choose your action: I or Q: i

* Provide the Key generated by the server.
* The best approach is to cut and paste it.
*** OBS: Do not include spaces or new lines.

Paste it here (or '\q' to quit):
523b0d579891be85956bb3da6c757455005eaf1508ef578186431efbebf5901ecb467ddd857ed5dfdeb5b2cb00e8911c6d031=

Agent information:
   ID:001
   Name:client
   IP Address:192.168.0.2

Confirm adding it?(y/n): y
Added.
Finally restart the OSSEC server and the client to enable and activate OSSEC HIDS.
::: code-group-item Ubuntu
server@ubuntu:~$ sudo /var/ossec/bin/ossec-control restart
client@ubuntu:~$ sudo /var/ossec/bin/ossec-control restart
::: ::: code-group-item Rocky
server@rocky:~$ sudo /var/ossec/bin/ossec-control restart
client@rocky:~$ sudo /var/ossec/bin/ossec-control restart
:::
To confirm that your agent is active, run the following command from the server.
::: code-group-item Ubuntu
server@ubuntu:~$ sudo /var/ossec/bin/agent_control -lc

OSSEC HIDS agent_control. List of available agents:
   ID: 000, Name: server (server), IP: 127.0.0.1, Active/Local
   ID: 001, Name: client, IP: 192.168.0.2, Active
::: ::: code-group-item Rocky
server@rocky:~$ sudo /var/ossec/bin/agent_control -lc

OSSEC HIDS agent_control. List of available agents:
   ID: 000, Name: server (server), IP: 127.0.0.1, Active/Local
   ID: 001, Name: client, IP: 192.168.0.2, Active
:::
If the agent does not appear, make sure that the firewall settings are in place and that the correct ports are opened on both environments. See the Firewall settings section for more information.
Agentless monitoring
TIP
The agentless monitoring has so far only been tested with VMware ESXi 6.7. The result is still not 100% but will give an overview on how to configure your agentless servers or devices.
Generate SSH keys for the OSSEC user.
::: code-group-item Ubuntu
server@ubuntu:~$ sudo -u ossec ssh-keygen::: ::: code-group-item Rocky
server@rocky:~$ sudo -u ossec ssh-keygen:::
If receiving Saving key "/var/ossec/.ssh/id_rsa" failed: Permission denied make sure that OSSEC is the directory owner of .ssh/.
::: code-group-item Ubuntu
server@ubuntu:~$ sudo chown -R ossec:ossec .ssh/ && sudo -u ossec ssh-keygen::: ::: code-group-item Rocky
server@rocky:~$ sudo chown -R ossec:ossec .ssh/ && sudo -u ossec ssh-keygen:::
VMware ESXi
Login as the administrator through the vSphere client. Go to the Host, Manage and advanced settings under the System tab.
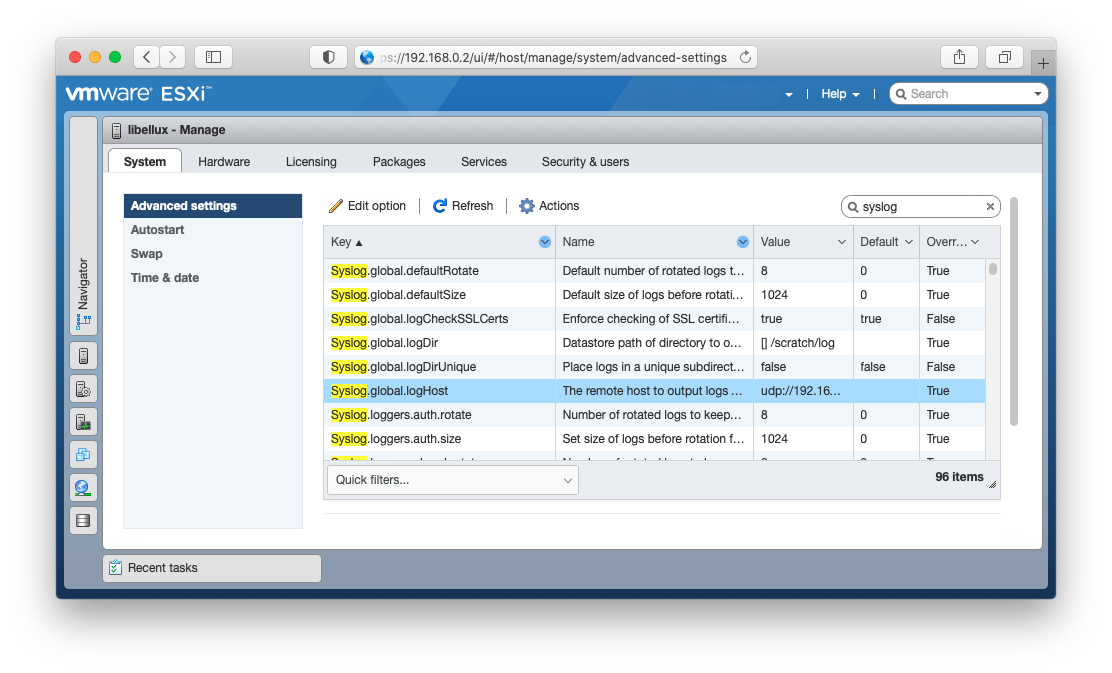
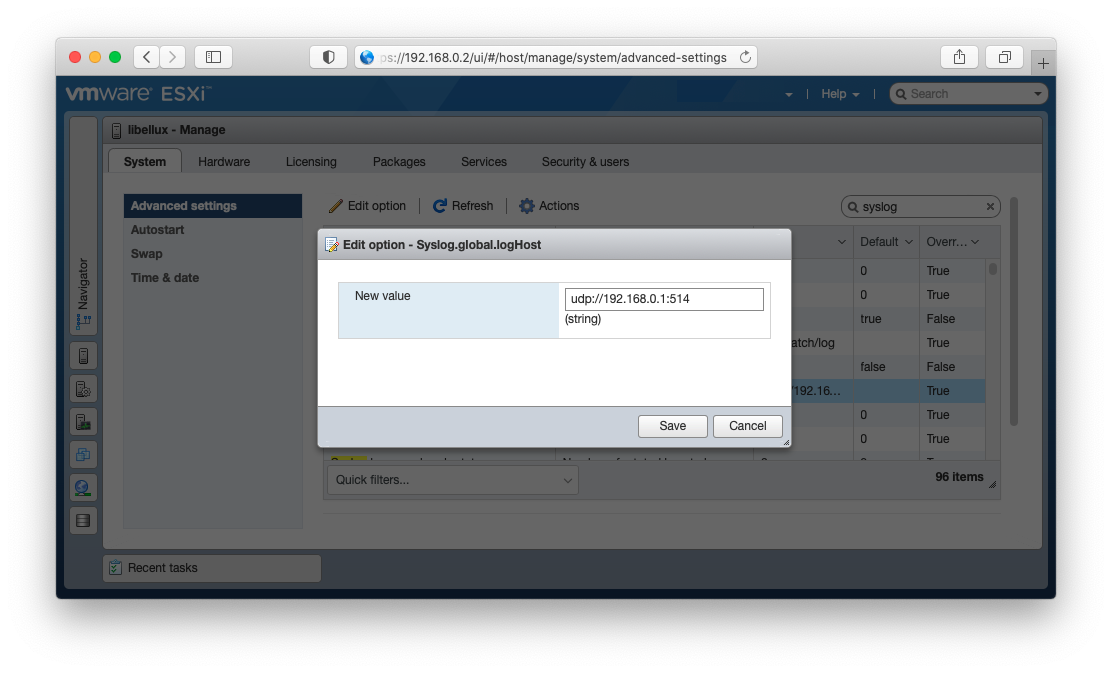
Filter by syslog and find the Syslog.global.logHOST parameter. Right click and select Edit option and set your remote OSSEC host.
Additionally you need to edit the /etc/profile.local file for the VMware ESXi SSH prompt as the agentless service expects the prompt to end with either # or $. As administrator, SSH to the VMware ESXi shell and using the vi editor append the following line.
# profile.local
# This file is not used when UEFI secure boot is enabled
PS1="\e[0;41m[\u@\h \W]\$ \e[m"
Enabling agentless monitoring
To enable agentless monitoring go back to your OSSEC server and execute the following command.
::: code-group-item Ubuntu
server@ubuntu:~$ /var/ossec/bin/ossec-control enable agentless::: ::: code-group-item Rocky
server@rocky:~$ /var/ossec/bin/ossec-control enable agentless:::
Proceed to add VMware ESXi server as agentless using the NOPASS option as it will be using SSH keys to communicate.
::: code-group-item Ubuntu
server@ubuntu:~$ /var/ossec/agentless/register_host.sh add [email protected] NOPASS::: ::: code-group-item Rocky
server@rocky:~$ /var/ossec/agentless/register_host.sh add [email protected] NOPASS:::
To test if the authentication works you can run the command below.
::: code-group-item Ubuntu
server@ubuntu:~$ sudo -u ossec ssh [email protected]::: ::: code-group-item Rocky
server@rocky:~$ sudo -u ossec ssh [email protected]:::
Configure agentless monitoring
For more information regarding setting up and configuring agentless monitoring, check the OSSEC documentation here.
Open the OSSEC configuration file and add the VMware ESXi IP address to the remote syslog section.
::: code-group-item Ubuntu
server@ubuntu:~$ sudo nano /var/ossec/etc/ossec.conf::: ::: code-group-item Rocky
server@rocky:~$ sudo nano /var/ossec/etc/ossec.conf:::
  <remote>
    <connection>syslog</connection>
    <allowed-ips>192.168.0.2</allowed-ips> <!-- VMware ESXi -->
  </remote>
Additionally add the agentless types to the configuration.
  <agentless>
    <type>ssh_integrity_check_bsd</type>
    <frequency>36000</frequency>
    <host>[email protected]</host> <!-- VMware ESXi -->
    <state>periodic</state>
    <arguments>/bin /etc/ /sbin</arguments>
  </agentless>

  <agentless>
    <type>ssh_generic_diff</type>
    <frequency>36000</frequency>
    <host>[email protected]</host> <!-- VMware ESXi -->
    <state>periodic_diff</state>
    <arguments>ls -la /etc; cat /etc/passwd</arguments>
  </agentless>
Finally restart OSSEC.
::: code-group-item Ubuntu
server@ubuntu:~$ sudo /var/ossec/bin/ossec-control restart::: ::: code-group-item Rocky
server@rocky:~$ sudo /var/ossec/bin/ossec-control restart:::
Firewall settings
The firewall being used is UFW (Uncomplicated Firewall). It is set by default to deny incoming traffic, allow outgoing traffic and allow port 22.
sudo ufw allow proto udp from 192.168.0.2 to any port 1514 comment "OSSEC client"
sudo ufw allow proto udp from 192.168.0.2 to any port 514 comment "OSSEC client syslog"Slack integration
Add the ossec-slack command within the command section of the OSSEC configuration file.
sudo nano /var/ossec/etc/ossec.confsudo nano /var/ossec/etc/ossec.confTo send all alerts to Slack with the pre-defined alert level, leave the expect segment blank.
<command>
  <name>ossec-slack</name>
  <executable>ossec-slack.sh</executable>
  <expect></expect> <!-- no expect args required -->
  <timeout_allowed>no</timeout_allowed>
</command>
In the active response section set the alert to preferred level.
<active-response>
  <command>ossec-slack</command>
  <location>server</location>
  <level>6</level>
</active-response>
Next edit the ossec-slack.sh file to match your Slack App settings.
sudo nano /var/ossec/active-response/bin/ossec-slack.shsudo nano /var/ossec/active-response/bin/ossec-slack.shINFO
Make sure that the log path is correct /../ in the ossec-slack.sh file.
SLACKUSER="OSSEC"
CHANNEL="#ossec-hids"
SITE="https://hooks.slack.com/services/XXXXXXXXX/XXXXXXXX/XXXXXXXXXXX"
SOURCE="ossec2slack"
...
# Logging
cd $LOCAL
cd ../
PWD=`pwd`
echo "`date` $0 $1 $2 $3 $4 $5 $6 $7 $8" >> ${PWD}/../logs/active-responses.log
Save the file and reload OSSEC and you should now start receive alerts to the defined Slack channel.
::: code-group-item Ubuntu
server@ubuntu:~$ sudo /var/ossec/bin/ossec-control reload::: ::: code-group-item Rocky
server@rocky:~$ sudo /var/ossec/bin/ossec-control reload:::
Cloudflare integration
WARNING
The Cloudflare integration requires you to have the jq (JSON processing) tool installed. This tool is used when removing blocked IP's following the repeated offenders timeout interval.
::: code-group-item Ubuntu
server@ubuntu:~$ sudo apt-get install jq::: ::: code-group-item Rocky
server@rocky:~$ sudo yum install jq:::
First add the cloudflare-ban command to the OSSEC configuration file.
::: code-group-item Ubuntu
server@ubuntu:~$ sudo nano /var/ossec/etc/ossec.conf::: ::: code-group-item Rocky
server@rocky:~$ sudo nano /var/ossec/etc/ossec.conf:::
<command>
  <name>cloudflare-ban</name>
  <executable>cloudflare-ban.sh</executable>
  <timeout_allowed>yes</timeout_allowed>
  <expect>srcip</expect>
</command>
In the active response section, set to block all level 6 alerts or greater.
<active-response>
  <command>cloudflare-ban</command>
  <location>server</location>
  <level>6</level>
  <timeout>43200</timeout>
</active-response>
Next proceed to update the cloudflare-ban.sh script and put your Cloudflare username along with your Global API key.
::: code-group-item Ubuntu
server@ubuntu:~$ sudo nano /var/ossec/active-response/bin/cloudflare-ban.sh::: ::: code-group-item Rocky
server@rocky:~$ sudo nano /var/ossec/active-response/bin/cloudflare-ban.sh:::
ACTION=$1
USER=$2
IP=$3
PWD=`pwd`
TOKEN='eyJhbGciOiJIUzI1NiIsInR5cCI6IkpXVCJ9ey'
USER='[email protected]'
MODE='block' # block or challenge
Save the changes and reload OSSEC.
::: code-group-item Ubuntu
server@ubuntu:~$ sudo /var/ossec/bin/ossec-control reload::: ::: code-group-item Rocky
server@rocky:~$ sudo /var/ossec/bin/ossec-control reload:::
To monitor the blocked IP address within the Cloudflare account, go to Firewall, Tools and IP Access Rules.
Upgrade OSSEC
To upgrade OSSEC, download the latest release, extract the file and run the install script. The installer will tell if OSSEC is already installed and if you wish to update it.
wget https://github.com/ossec/ossec-hids/archive/3.6.0.tar.gz
tar -zxvf 3.6.0.tar.gz
cd ossec-hids-3.6.0/
wget https://ftp.pcre.org/pub/pcre/pcre2-10.32.tar.gz
tar -zxvf pcre2-10.32.tar.gz -C src/external/
sudo apt-get install build-essential libssl-dev libpcre2-dev zlib1g-dev
sudo PCRE2_SYSTEM=yes ./install
Custom rules
Read more about how to create custom rules and decoders here.
Ignore snap loop devices
/var/ossec/rules/local_rules.xml
<rule id="100100" level="0">
  <if_sid>531</if_sid>
  <regex>'df -P':\s+/dev/loop\d+\s+\d+\s+\d+\s+0\s+100%\s+/snap/\w+/\d+</regex>
  <description>Ignore full snap loop devices.</description>
</rule>
Monitor failed M/Monit authentication
/var/ossec/rules/local_rules.xml
<rule id="100101" level="6">
  <if_sid>2501</if_sid>
  <match>Unauthorized, authentication failed for</match>
  <group>authentication_failed,</group>
  <description>User authentication failure.</description>
</rule>
/var/ossec/etc/oseec.conf
<localfile>
  <log_format>syslog</log_format>
  <location>/usr/local/mmonit-3.7.2/logs/error.log</location>
</localfile>
Mute useless systemd-resolved message
/var/ossec/rules/local_rules.xml
<rule id="100102" level="0">
  <program_name>systemd-resolved</program_name>
  <match>Server returned error NXDOMAIN</match>
  <description>Useless systemd-resolved log message.</description>
</rule>
Alert on fail2ban action
/var/ossec/rules/local_rules.xml
<rule id="100103" level="6">
  <match>fail2ban.actions</match>
  <group>authentication_failed,</group>
  <description>Fail2ban action taken.</description>
</rule>
/var/ossec/etc/oseec.conf
<localfile>
  <log_format>syslog</log_format>
  <location>/var/log/fail2ban.log</location>
</localfile>
Command-line
| Command | Description |
|---|---|
| /var/ossec/bin/agent_control -lc | List all active agents |
| /var/ossec/bin/ossec-logtest | Logtest |
| /var/ossec/bin/ossec-control | start,stop,reload,restart,status,enable,disable |
| /var/ossec/bin/manage_agents | manage agents (e.g., add, remove) |
Troubleshooting
If you encounter any issue or having questions regarding OSSEC I recommend using their very helpful mailing list.
You can also read more about debug mode and how to view more verbose logs here.
Questions, comments, or problems regarding this service? Create an issue here or contact [email protected].

